Below is the complete FogBugz Documentation in one HTML page.
FogBugz is a complete project management system optimized for software teams. It helps you make better software by tracking, prioritizing, and coordinating the thousands of small tasks a development team has to do. FogBugz is web based, so you access most of the functionality through your web browser.
At the heart of FogBugz is a database of cases. There are three kinds of cases:
 Bugs: things which don't work right
 Features: new things being planned
 Inquiries: email questions from customers
Every case is prioritized, categorized, and assigned to exactly one person on your team who must either resolve it or assign it to someone else. Developers work through their cases one by one, in order of priority. Source code integration makes it easy to see which check-ins were associated with which bugs or features, and allows you to set up an elegant online code review system.
Where do cases come from?
A case can be entered by someone on your team or by an outside customer. It can be submitted via the web or through email. Email inquiries can be automatically sorted into categories. A case can be entered automatically from running software in the field. For example, if your software crashes, it can upload details of the crash to FogBugz automatically. A handy screenshot tool that runs on your Windows or Macintosh desktop lets you submit a picture of a bug to FogBugz in two clicks. FogBugz even runs online discussion groups for your customers; when a customer finds a bug or brings up a feature request, a single click creates a new case linked to the discussion.
Slicing and Dicing
The FogBugz filter feature and advanced full-text search make it easy to sort and search. You can constantly re-prioritize and reassign cases and track estimates, making it easy to track your project and ship on schedule. When a release is done you can automatically generate release notes.
Customer Email
One of the best features of FogBugz is the email management capability. When an email message comes in from a customer, spam is automatically discarded and the remaining messages are sorted into categories, based on how you train the system. Anyone on the team can respond to email and instantly see the entire history of the email conversation with that customer. Customers get an automatic email reply with a URL they can click to check the status of their inquiry. When a customer asks a common question, you can reply with a predefined snippet with as few as two keystrokes. When a customer reports a bug, via email or on a discussion group, it can easily be assigned to a developer to fix and be tracked just like any other bug. You can assign due dates and receive escalation reports to make sure customers receive timely responses.
Discussion Groups
The discussion group feature allows you to create clean, simple, and easy-to-use discussion groups for your customers. Innovative anti-spam technology prevents abuse, while a super-simple user interface encourages participation. You can even customize the appearance of the discussion groups to fit right in with your corporate web site. You can set up private discussion groups which are a great way to coordinate far-flung teams of developers and capture their knowledge permanently.
Don't Let The Documentation Scare You!
FogBugz is quite an elaborate system, and as you learn more about it, you'll be surprised at just how useful it is for managing software projects. Although we have extremely detailed online documentation, the truth is that most people will never read it—FogBugz is that easy. The documentation is designed to be an "encyclopedia of FogBugz" that you can use to look things up. If you're just getting started, it's probably enough to read one topic—The Basics of Bug Tracking—and then dive into using FogBugz. Later you can refer back to the help topics as needed if you have any questions.
FogBugz 5.0 is a major new release designed to make the most of modern web browsers. The most common tasks are faster and easier. There are also hundreds of minor improvements and bug fixes throughout FogBugz.
Major New Features
-
Many operations are now handled entirely by your web browser, without reloading web pages. For example, when you click Edit to edit a case, the edit box appears instantly without reloading the page.
-
When you list cases, you can show as many columns as you want. Each column can be resized, rearranged, and sorted with the mouse. The customized layout will be saved with your filter.
-
Extensive
keyboard shortcuts save you from reaching for the mouse. Type Ctrl+; (semicolon) anywhere in FogBugz to activate keyboard shortcuts.
-
You can now attach multiple file attachments whenever you create or modify a bug.
-
As of FogBugz 5.0.19, PHP 5 is a supported server platform for FogBugz on Linux, Unix, and Mac
Other Improvements
- Improved multiple selection in the list page
- Forwarding an email includes file attachments from the original email by default
- Improved support for MySQL on Windows, including support in Setup
- Hovering your mouse over a case number shows you a summary of the case, including the most recent comment.
If you're upgrading from FogBugz 3.0 or earlier, you may want to check out What's New in 4.0.
FogBugz 4.0 is a major new release with huge new areas of functionality, significant improvements to basic bug tracking, and literally hundreds of small improvements throughout. These are some of the biggest new features you'll find if you're upgrading from FogBugz 3.0.
Major New Features
The new FogBugz Screenshot tool runs on your Windows or Macintosh desktop and lets you submit screenshots of bugs to FogBugz with just two mouse clicks.
Fine-grained permissions allows you to create groups based on clients or departments, and grant permissions to users in those groups.
Discussion groups for your team or customers with advanced moderation and spam filtering. You can even link discussion topics to FogBugz cases to make sure your customers are getting replies to questions they ask in the discussion group.
Due dates allow you to track urgent bugs and features, and insure that customer email gets a timely response.
RSS support lets you subscribe to any saved filter or any individual bug using an RSS reader.
Maintain release notes and compile them automatically so you can generate one of these "What's New" pages for your own software.
Automatic conflict detection warns you if you are about to submit a change to a bug that someone else changed behind your back.
Customize holidays, workdays, and working hours.
Email handling is substantially enhanced to make FogBugz the ultimate team email client. New features:
- An extremely effective spam filter filters incoming spam using Bayesian Filtering, the most reliable method known today for spam blocking.
- FogBugz AutoSort automatically sorts incoming email into categories based on the training you provide.
- Compose and track email to customers from right inside FogBugz using the Send Email menu item.
- Predefined snippets let you respond to frequently-asked questions by typing a couple of keystrokes.
- Send a confirmation email automatically to customers when mail messages are received, optionally giving the customer a URL they can use to track the status of their case.
- Quickly find other email from the same customer or domain name.
- Email threads are shown more compactly by hiding the "original message" portion of email replies.
- Automatically set a due date for responding to customer email (e.g. "within 4 business hours") and track customer email that hasn't been replied to in time.
- Better handling of large attachments.
Major Improvements
Edit filters with a click of the mouse right on the list page.
Manage saved filters just like web browser favorites.
Batch editing lets you do anything to a group of bugs that you can do to a single bug:
- Select multiple bugs on the list page with checkboxes, or, to select a group of bugs all at once, click on the checkbox at one end of the group you want to select and then shift-click on the checkbox at the other end.
- Make any change to a group of bugs (for example, change all their priorities) at once. You can even perform multiple steps (e.g. first resolve and then close a block of bugs) without having to reselect them.
A fresh new user interface that's clearer, simpler, and more attractive.
Other Significant Improvements
Integrate bug tracking with source code control software, now with support for Subversion, Perforce, CVS, SourceSafe, and Vault.
New log on method: type an email address (instead of choosing from a dropdown list) for enhanced security.
Keep track of which cases you have seen and which ones have been edited since you last saw them by using the "visited links" coloring feature of your web browser.
Automatic two way links between related cases.
Set up Shared Filters usable by all users.
The search box is now present on every page for easy access.
Customize which columns appear on the list page.
Optimized for 800-pixel wide screens instead of 640.
File attachments are now stored in the database so backup is easier.
See more than 500 bugs at once, if you really need to, using a special link at the bottom of the List page.
FogBugz preserves tabs and whitespace in bug reports for better code formatting.
Rename the "Computer" and "Version" extra fields if you have a better use for them, or hide them if you don't need them.
Sort by last modification to see the bugs that have been changed most recently.
The easiest way to understand bug tracking is to follow a bug around, for the purpose of illustration, from the moment it's born until someone finally puts it out of its misery. We'll follow the famous Bug 1203. Here's what FogBugz shows for that bug:
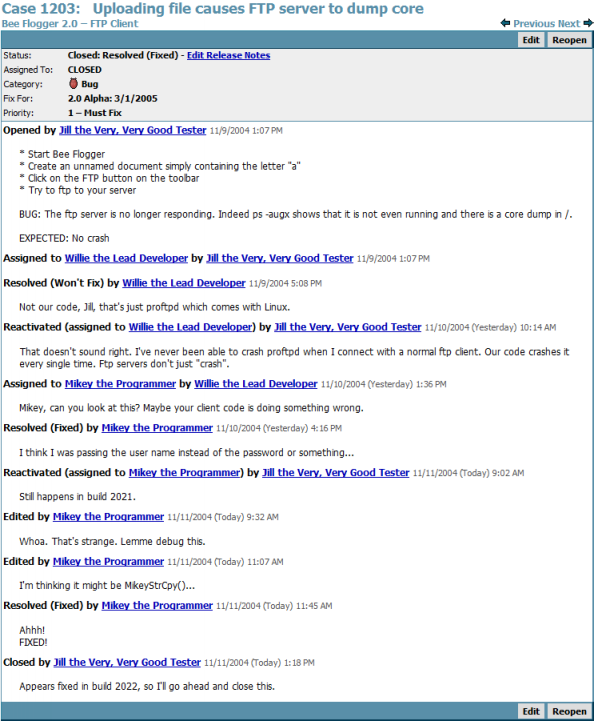
Here's what happened.
Mikey the Programmer is hacking away on the new FTP client feature of his groovy Macintosh software. At some point, because he's feeling frisky, he writes his own string-copy function. That'll teach them pesky reusability police! Bwa ha ha!
Bad things happen when you don't reuse code, Mikey. And today, the bad thing that happened was that Mikey forgot to null-terminate the copied string. But he never noticed the problem because most of the time he happened to be copying strings into pre-zeroed memory.
Later that week, Jill the Very, Very Good Tester is banging away at the code, rolling her forehead back and forth on the keyboard or some equally cruel test. (Incidentally, most good testers are named Jill, or some variation like Gillian.) Suddenly something very strange happens: the ftp daemon she was testing against crashed. Yes, I know it's a Linux machine and Linux machines never crash (no snorting sounds from the slashdot crowd, please) but this dang thing crashed. And she wasn't even touching the server, she was just FTPing files to it using Mikey's Mac code.
Now, Jill is a very, very good tester, so she's kept a careful log of what she was doing (the precise pitch and yaw of her head as she rolled it on the keyboard is in her lab book, for example). She reboots everything, starts with a clean machine, repeats the steps, and -- Lo and Behold -- it happens again! The Linux ftp daemon crashed again! That's twice in one day, now! Take that, Linus.
Jill squints at the list of repro steps. There are about twenty steps. Some of them don't seem related. After a bit of experimentation, Jill is able to whittle the problem down to four steps that always cause the same behavior. Now she's ready to file a bug.
Jill enters the new bug in the bug tracking database. Now, just the act of entering a bug requires some discipline: there are good bug reports and bad bug reports.
Three Parts To Every Good Bug Report
And the Lord spake, saying, "First shalt thou take out the Holy Pin. Then, shalt thou count to three, no more, no less. Three shall be the number thou shalt count, and the number of the counting shalt be three. Four shalt thou not count, nor either count thou two, excepting that thou then proceed to three. Five is right out. Once the number three, being the third number, be reached, then lobbest thou thy Holy Hand Grenade of Antioch towards thou foe, who being naughty in my sight, shall snuff it."
— Monty Python and the Holy Grail
It's pretty easy to remember the rule for a good bug report. Every good bug report needs exactly three things.
- Steps to reproduce,
- What you expected to see, and
- What you saw instead.
Seems easy, right? Maybe not. As a programmer, people regularly assign me bugs where they left out one piece or another.
If you don't tell me how to repro the bug, I probably will have no idea what you are talking about. "The program crashed and left a smelly turd-like object on the desk." That's nice, honey. I can't do anything about it unless you tell me what you were doing. Now, I admit that there are two cases where it's hard to get exact steps to repro. Sometimes you just don't remember, or you're just transcribing a bug from "the field." (By the way, why do they call it "the field"? Is it, like, a field of rye or something? Anyway...) The other time it's OK not to have repro steps is when the bug happens sometimes but not all the time, but you should still provide repro steps, with a little annotation that says that it doesn't happen too often. In these cases, it's going to be really hard to find the bug, but we can try.
If you don't specify what you expected to see, I may not understand why this is a bug. The splash screen has blood on it. So what? I cut my fingers when I was coding it. What did you expect? Ah, you say that the spec required no blood! Now I understand why you consider this a bug.
Part three. What you saw instead. If you don't tell me this, I don't know what the bug is. That one is kind of obvious.
Back To Our Story
Anyhoo. Jill enters the bug. In a good bug tracking system it gets automatically assigned to the lead developer for that project. And therein lies the second concept: every bug needs to be assigned to exactly one person at all times, until it is closed. A bug is like a hot potato: when it's assigned to you, you are responsible to resolve it, somehow, or assign it to someone else.
Willie, the lead developer, looks at the bug, decides it's probably something to do with the ftp server, and resolves it as "won't fix." After all, they didn't write the ftp server.
When a bug is resolved, it gets assigned back to the person who opened it. This is a crucial point. It does not go away just because a programmer thinks it should. The golden rule is that only the person who opened the bug can close the bug. The programmer can resolve the bug, meaning, "hey, I think this is done," but to actually close the bug and get it off the books, the original person who opened it needs to confirm that it was actually fixed or agree that it shouldn't be fixed for some reason.
Jill gets an email telling her that the bug is back in her court. She looks at it and reads Willie the Lead Developer's comments. Something doesn't sound right. People have been using this ftp server for years and it doesn't crash. It only crashes when you use Mikey's code. So Jill reactivates the bug explaining her position, and the bug goes back to Willie. This time Willie assigns the bug to Mikey to fix.
Mikey studies the bug, thinks long and hard, and completely misdiagnoses the bug. He fixes some altogether different bug, and then resolves the one Jill opened.
The bug is back to Jill, this time marked "RESOLVED-FIXED". Jill tries her repro steps with the latest build, and, lo and behold, the Linux server crashes. She reactivates the bug again and assigns it straight back to Mikey.
Mikey is perplexed, but he finally tracks down the source of the bug. (Know what it is yet? I'll leave it as an exercise to the reader. I've given you enough clues!) He fixes it, tests it, and -- Eureka! The repro case no longer crashes the ftp server. Once again, he resolves it as FIXED. Jill also tries the repro steps, discovers that the bug is good 'n' fixed, and closes it out.
Summary
The story of every bug is a variation on this theme:
- Someone finds it and reports it
- The bug gets bounced around from person to person until it finds the person who is really going to resolve it
- When the bug is resolved, it goes back to the person who originally reported it for confirmation
- If, and only if, they are satisfied with the resolution, they close the bug, and you never see it again.
- A good tester will always try to reduce the repro steps to the minimal steps to reproduce; this is extremely helpful for the programmer who has to find the bug.
- Remember that the only person who should close a bug is the person who opened it in the first place. Anyone can resolve it, but only the person who saw the bug can really be sure that what they saw is fixed.
- There are many ways to resolve a bug. FogBugz allows you to resolve a bug as fixed, won't fix, postponed, not reproducible, duplicate, or by design.
- Not Reproducible means that nobody could ever reproduce the bug. Programmers often use this to send a bug back to the tester when the report is missing the critical repro steps.
- You'll want to keep careful track of versions. Every build of the software that you give to testers should have a build ID number so that the poor tester doesn't have to retest the bug on a version of the software where it wasn't even supposed to be fixed.
- If you're a programmer, and you're having trouble getting testers to use FogBugz, just don't accept bug reports by any other method. If your testers are used to sending you email with bug reports, just bounce the emails back to them with a brief message: "Please put this in the bug database. I can't keep track of email."
- If you're a tester, and you're having trouble getting programmers to use FogBugz, just don't tell them about bugs—put them in the database and let the database email them.
- If you're a programmer, and only some of your colleagues use FogBugz, just start assigning them bugs. Eventually they'll get the hint.
- If you're a manager, and nobody seems to be using FogBugz, start assigning new features to your team using FogBugz. Eventually they'll realize that instead of coming into your office every few days saying "what should I do next?" they can just see what's assigned to them in FogBugz.
- Avoid the temptation to add new fields to FogBugz. Every month or so, somebody will come up with a great idea for a new field to put in the database. You get all kinds of clever ideas, for example, keeping track of the file where the bug was found; keeping track of how often the bug is reproducible; keeping track of how many times the bug occurred; keeping track of which exact versions of which DLLs were installed on the machine where the bug happened. It's very important not to give in to these ideas. If you do, your new bug entry screen will end up with a thousand fields that you need to supply, and nobody will want to input bug reports any more. For the bug database to work, everybody needs to use it, and if entering bugs "formally" is too much work, people will go around the bug database.
Usually, when you click List in FogBugz, you don't see every single case in the system; you only see a selection of the cases that match your current filter.
Your filter is remembered across browsers and sessions.
To see fewer cases, you can refine a filter, adding a criterion, by clicking on the name of the filter.
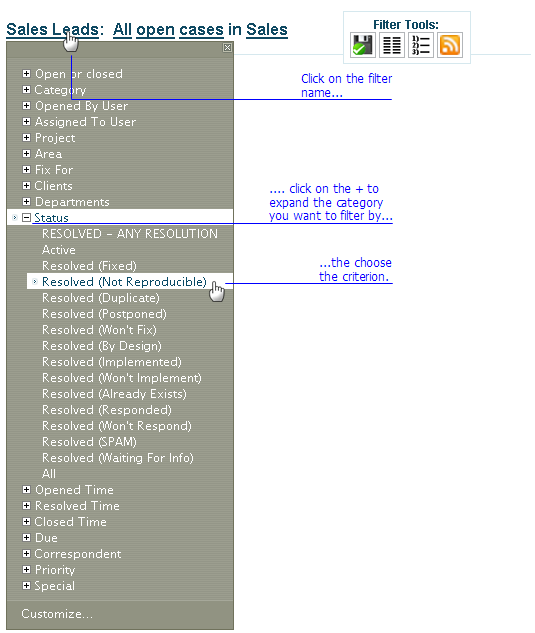
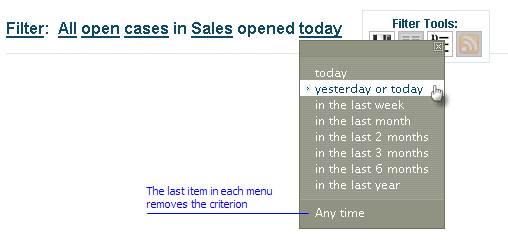
To change or remove a criterion, click on the underlined term:
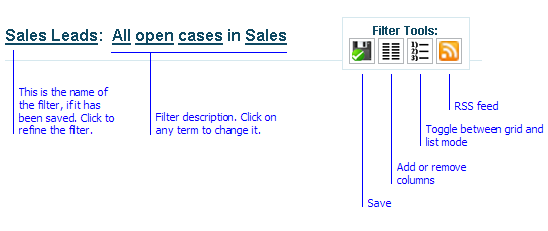
Four filter tools are always available.
- The Save button lets you save a filter with a name. After you have saved it, it appears in the Filters menu at the top of the screen. FogBugz administrators can share their saved filters.
- The Columns button determines which columns appear in the current filter.
- The list/grid button switches between list mode, which takes up less space by listing each case on several lines, and grid mode, which shows each case on one line.
- The RSS button provides a link to an RSS feed for the current filter which you can use in your RSS aggregator. RSS feeds are only available when you have saved the filter.
With the mouse, you can:
Rearrange columns with the mouse, by dragging the column header left and right.
Change the width of a column by dragging the thin white separator between two column headers.
Sort by a column by clicking on the column header; reverse sort by clicking it again.
Tip: To sort by two or three terms, click the column headers in reverse order. For example, to sort by area first, and by priority second, click on the Priority header and then the Area header.
When you save a filter, you also save the corresponding column layout. This feature allows you to associate customized views with any saved filter and easily see the data that's most important.
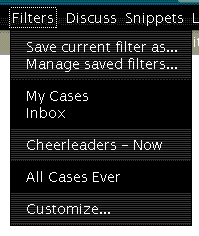
For more precise control over the filter conditions, you can click the word "Filter" or the name of the filter, or choose the Filters menu, and click Customize (at the bottom of the menu) to go to a detailed filter setup page. You can also use the Filters menu in the User tool stripe to quickly switch to a different saved filter:
Next: Learn more about saving and sharing filters.
Sometimes it's helpful to save filters, just like bookmarks in a web browser, so you can quickly go back to a particular list of bugs.
 Once you have your filter set up exactly the way you want it, click on the save icon in the Filter Tools and type a name for the filter.
The saved filter will be available from the Filters menu at the top of the screen.Saving your filter will also save the current column layout so you'll see your filter the same way when you load it again.
To modify or delete saved filters, click on the Filters menu and choose Manage saved filters.
Shared Filters
If you are logged onto FogBugz as an adminstrator, you can create filters that the whole team can use. Simply go to the Manage Saved Filters screen, find the filter you want to share, and then click the Shared checkbox. This filter will now appear on everybody's Filters menu.
Search Results vs. Filter Results
When you search for text in FogBugz, using the Search box in the top right corner, FogBugz temporarily shows you a list of bugs that match the search terms, not the list of bugs from your filter. As soon as you click List again, you're back to looking at the bugs that match your filter.
Subscribing to Filters With RSS
See RSS Notifications.
A picture can be worth a thousand words, and sometimes adding a screenshot showing a bug to your bug reports can save a lot of explanation. The FogBugz Screenshot tool runs on your Windows or Macintosh desktop. To install it, log into FogBugz and on that first page click the Capture Screenshots link in the middle of the page. NOTE: Only licensed users will be able to submit screenshots into FogBugz.
When you download and install the FogBugz Screenshot program, a bug icon will appear on your screen.
Windows:
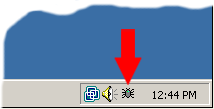
When you click on the bug icon, it will capture the current screen.
Once you've captured a screenshot, you can crop it to make it smaller, or highlight a particular area with a red border to illustrate the exact part of the screen that represents the bug. Then you can send it to a new case or append the screenshot to an existing case.
Tip: By right clicking on the screenshot tool, a menu appears allowing you to enter a bug directly without capturing a screenshot. This is the fastest way to launch your browser and go to the New Case page.
To uninstall the FogBugz Screenshot tool: first quit the program by right clicking on the screenshot icon shown above and selecting Exit, then use the Add or Remove Programs feature in the Windows Control Panel.
Capturing a screenshot makes a camera shutter sound. To turn off this sound, click Sound:OFF in the bottom right corner of the Screenshot window.
To change the URL where screenshots are sent, click on the URL at the bottom of the screen. By default, this is set correctly, but if you use more than one bug tracking database, you'll have to adjust this. Use the basic URL of FogBugz, including http://, but without any file name. For example, http://www.example.com/FogBugz
Macintosh:
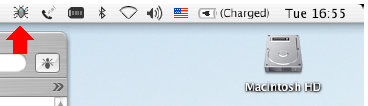
When you click the bug icon, you will have a choice of capturing a window, a rectangle, or the whole screen. After capturing, you can highlight a particular area with a red border to illustrate the exact part of the screen that represents the bug. Then you can send it to a new case or append the screenshot to an existing case.
Capturing a screenshot makes a camera shutter sound. To turn off this sound, click Sound:OFF in the bottom right corner of the Screenshot window.
To change the URL where screenshots are sent, click on the URL at the bottom of the screen. By default, this is set correctly, but if you use more than one bug tracking database, you'll have to adjust this. Use the basic URL of FogBugz, including http://, but without any file name. For example, http://www.example.com/FogBugz
FogBugz has several features allowing you to keep a handle on your development schedule:
-
Priorities from 1-7 let you decide what gets done first.
-
Releases lets you decide which case will be fixed for which upcoming release of your software. You can also gather
Release Notes. Each case also has a
Version field to track where a bug was first seen.
-
Estimates let you provide detailed estimates for how long a case will take to resolve in hours or days, and how much time has already been spent on it.
-
Due dates let you add a specific due date and time to a specific case, and ensure that customer requests are responded to promptly.
You can create a hyperlink from one case to another very easily: just type the word "case" followed by the number of the case to link to.
For the purposes of this description, let's say you're entering comments in case 10. If you type "see case 20", FogBugz will turn "case 20" into a link to case 20. (If you like, you can use the word "bug" instead of "case").
Not only does this create a link to case 20 within case 10, but when you view case 20, you will see case 10 listed as a "Related Case". (This, of course, is a clickable link back to case 10.)
When one bug report is a duplicate of another bug report, you should resolve it as "Resolved (Duplicate)". That lets you enter the number of the bug that it is a duplicate of, and this becomes a hyperlink. Once again, this link goes both ways between the cases.
Working Through a List of Cases
Often, you want to work through a list of cases—checking that they are assigned to the right person, re-evaluating their priorities, etc. FogBugz makes this easy in a number of ways.
Next/Previous Buttons in Cases
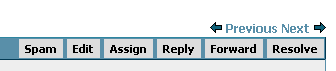
There are Next and Previous buttons in the top right corner of the case, which show the next or previous case in your current filter:
-
Note: If you change the case's position in the filter while you work through the list, you may be confused by the behavior of the Next button. For example, if your filter lists cases in order of priority, and you change a case's priority to be higher, clicking Next will take you to a case you've already seen. The easiest way to prevent this is to use a stable sort order, for example, sort by Case ID number, which won't change as you work through the list.
If you're using keyboard shortcuts, then after hitting Ctrl-; you can use the [ (left square bracket) and ] (right square bracket) keys as shortcuts for Previous and Next.
Link Colors in Lists
Another thing to notice is that FogBugz carefully coordinates with your web browser to insure that bugs you've already seen are shown in the "visited links" color (usually purple) while bugs you haven't seen are in the "unvisited links" color (usually blue).
This makes it easy to work through a list of bugs by returning to the List page and clicking on the next blue link in the list. Lather, rinse, and repeat until they're all purple.
The cool thing is that FogBugz will change the URL for any bug that changes after you last saw it. That way, if anything changes about a bug that you've already looked at, the link to that bug will go from purple back to blue again.
Receiving Notifications of Changes to the List
FogBugz publishes RSS Feeds allowing you to use an RSS Aggregator to receive notifications, so you can keep up to date on changes to your filter without opening your web browser. Read more on RSS.
Open All Cases, Each in its Own Browser Tab
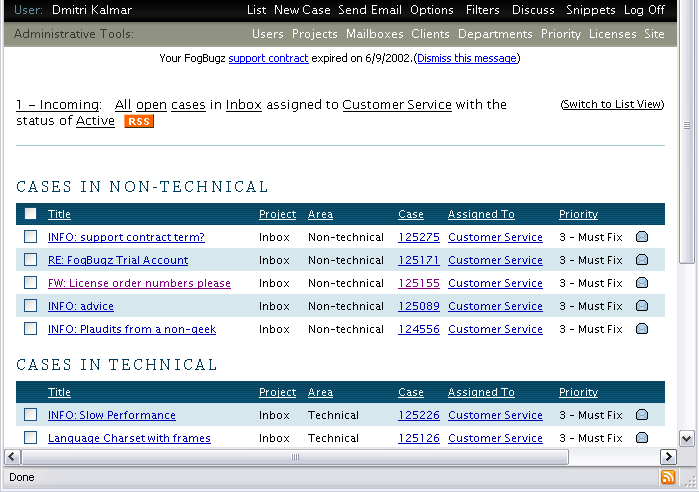
The Firefox browser supports both RSS and tabbed browsing which, combined with FogBugz RSS feeds for saved filters, allow for a very time-efficient way to walk through every case in a list. For example, this is ideal for a list of incoming customer emails that all need to be answered.
The screenshot above shows a saved filter named "1 - Incoming" (the numeral "1" is just there so that this filter shows up first in the list of saved filters). Because it is a saved filter, FogBugz creates an RSS feed. Because FogBugz creates the RSS feed, FireFox displays a small orange RSS button at the bottom right corner of the browser window. You can click that button and select Subscribe to '1 - Incoming':
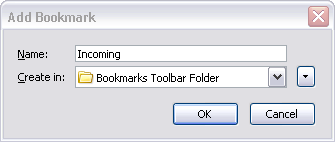
Choose "Bookmarks Toolbar Folder" so that it will show up as a button on the browser toolbar. Give it a short name like "Incoming" so as not to take up too much space on the toolbar. If you click on this new Incoming button in your browser, you see the list of cases. Fine, that's not exciting because you already have the list of cases, but here's the nifty time-saver: right-click on the Incoming button and choose "Open in Tabs", and you're given every case in the list displayed each in its own tab:
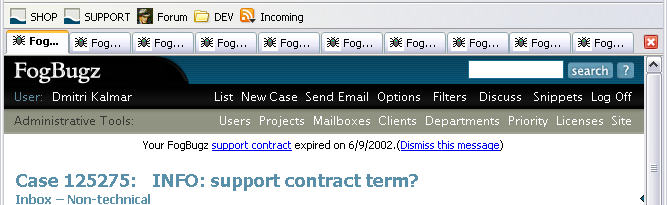
Once you click "Send and Close", you can hit Ctrl-W to close that tab rather than waiting for FogBugz to reload the list page in that tab.
The main advantage of this whole approach is just to eliminate waiting for page loads. To keep it from going out of sync with the actual list, you will need to right-click the Incoming button and choose "Refresh Live Bookmark" every now and then.
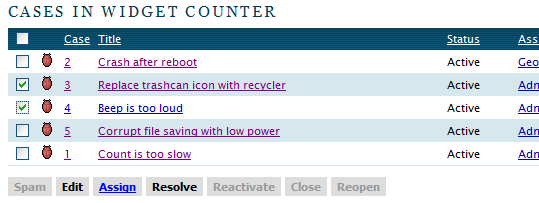
FogBugz lets you do almost anything to a bunch of bugs that you can do to a single bug. Simply set up the filter that includes all the bugs you are interested in, go to the list page, check off the bugs you want to manipulate, and click on the appropriate action button.
To select any range of consecutive bugs, check the first box, then hold down the Shift key and check the last box.
Be patient; batch editing can take a while if you have selected a lot of bugs.
Tip: Clicking on the checkbox in the column header selects or unselects all the grouped bugs under that heading.
FogBugz publishes RSS feeds, allowing you to use an RSS aggregator to receive notifications, so you can keep up to date on changes to your filter without opening your web browser. FogBugz supports RSS version 2.0.
Note: An RSS ("Really Simple Syndication") reader or aggregator is a program that checks with a bunch of websites to see if there's anything new there, and shows you a list of new items on all the sites in one central location. That way you don't have to visit sites that haven't added anything new since the last time you looked. Many websites, including popular news websites and most weblogs, publish RSS feeds so that RSS aggregators can find out if anything new has appeared.
FogBugz creates an RSS feed automatically whenever you save a filter. For the RSS link, go into the Manage Saved Filters screen. You will see a little orange RSS link next to every saved filter. Copy the link location into your favorite RSS aggregator.
Note: Some RSS readers may not support cookies, making it impossible for them to keep you logged on to FogBugz. To work around this problem, you will need to append your user name and password to the end of your feed link manually:
(FogBugz-generated RSS link)&sEmail=email&sPassword=password
You can also subscribe to a single bug using RSS, which will notify you as that bug changes, just as subscribing by email would. Simply enter the URL of the bug itself in your RSS aggregator, which will automatically discover the URL of the RSS link for that bug. The URL of bug number 1234 is http://fogbugz/?1234 where fogbugz is your main FogBugz URL. (If your aggregator cannot automatically find the RSS url, you can enter it manually as http://fogbugz/rss.asp?ixBug=1234)
For a time-saving tip on using a tabbed browser to display each case in a list in its own tab, see this article.
The Options page lets you configure your personal options in FogBugz. Anyone who is logged on as an administrator can change the options for any user; everyone else can only change their own options.
You can configure:
- Your full name as it appears in FogBugz.
- Your password.
- Your email address. If you wish to receive multiple copies of each notification email at different addresses, separate the addresses by commas.
- Your preferred language for FogBugz to use.
- Your preferred date, time, and number format for FogBugz to use.
- Your phone number.
- Whether you will receive automatic email notifications.
- Whether you are subscribed to a morning escalation report listing all cases which are past due or due that day.
- The keyboard shortcut used for snippets. By default this is set to `, but if you are using a non-US keyboard there may be other keys which are easier to type.
If you are an administrator, you can also use the Options page to configure the following user options:
- Whether the user is an administrator or not.
- Whether the user account is active or not. An inactive account can't be logged into and won't count against the total number of licenses you have purchased for FogBugz. For example, if an employee leaves the company, you can deactivate their FogBugz account and free up that license for another person.
At the bottom of every case page is a link that lets you subscribe to that case. This will send you an email notification whenever anything changes about that case.
In the interest of reducing the amount of unwanted email, FogBugz does not let you force-subscribe someone else to a case. If you want them to know about it, you should temporarily assign the case to them with a note like "FYI" (which sends them a notification email) and then immediately assign it back to whomever it really belongs.
There are three other ways to get notifications when cases you're interested in have changed:
-
You can subscribe to a case using
RSS.
-
The "visited" link color (purple) on the List page will change to the "unvisited" color (blue) if anything has changed about the bug since you last looked at it.
-
You can subscribe to a daily escalation report in the Options screen; the daily escalation report is emailed every morning and lists all overdue bugs and all bugs which will become due that day.
Also note that FogBugz will always tell you:
- if someone has assigned a bug to you
- if someone has changed a bug which is already assigned to you
You can turn off email from the Options screen, but this is probably not a good idea. You should only turn off email if:
- You already spend so much time in FogBugz you won't miss new cases assigned to you
- You are setting up a virtual account that doesn't correspond to a real human to hold bugs temporarily for one reason or another
FogBugz can be integrated with popular source control systems. This creates a two-way link: when you're looking at a bug, you can see the list of code changes and check-ins associated with it, and when you're looking at a check-in, you can see which bug it was meant to fix.
If you don't already have source control, Fog Creek Software highly recommends Subversion. It's free, and available from http://subversion.tigris.org/. On all but the largest projects, it works just as well as more expensive source control systems and is extremely reliable. If you need more convincing, check out the screenshots here which show the 360 connections between FogBugz and Subversion.
Virtual Tour
We have a thorough step-by-step tour of this integration showing screenshots from either CVS, Perforce, or VSS.
Setup
Read on to set up integration with CVS, Subversion, Perforce, VSS, or Vault.
FogBugz incorporates extensive features for receiving, tracking, and responding to customer email.
How it works:
- A message arrives in a mailbox on your mail server.
- Periodically, FogBugz uses the POP3 protocol to check your mail server for new messages.
- If any messages are found, FogBugz downloads them from the mail server and creates a case out of each one.
- If you're using the AutoSort feature, FogBugz discards spam and sorts the rest of the messages into areas according to topic.
- If desired, FogBugz sends an immediate reply to the customer, providing them with a URL they can use to check on the status of their request.
- Once the message is in FogBugz, you can treat it like any other case: you can prioritize it, assign it, track it, slice it, dice it, deep fry it, etc.
- At any time you can reply to the message from within FogBugz. FogBugz will insert the case number into the subject line of the outgoing message.
- If the customer responds to your reply, as long as they don't remove the FogBugz case number from the subject, their response will be appended to the current case rather than opening a new case.
- FogBugz will keep a complete transcript of everything that happens with the case, including all relevant incoming and outgoing email and even private internal conversations about the case which the customer does not see.
You can use FogBugz email integration to manage customer service or a helpdesk. FogBugz can set automatic due dates on incoming email so you can be certain that customers are receiving replies to their email inquiries in a timely fashion.
Another use of FogBugz email integration is to create a customer bug-reporting address or a suggestion box. Since all customer emails go right into FogBugz, you can treat them just like bugs or features: assign them to developers, schedule them, assign priorities and due dates, and so on. When the feature is implemented or the bug is fixed, with one click you can reply to the customer to notify them of this.
Note that the public can also submit new cases via "public projects", and can post on public forums (you can turn a forum post into an internal case with one click).
To learn more about managing customer email, read these topics:
FogBugz gives you full-fledged discussion groups built in.
Discussion groups can be private or public.
Private discussion groups are a great way to communicate in your team. Unlike private email, once conversations are captured in a discussion group, they will always be visible and searchable, capturing valuable development knowledge for posterity.
Public discussion groups are a great way to communicate with your customers and provide tech support for customers. The biggest advantage of communicating with your customers over a discussion group instead of email is that you won't have to repeat yourself so much, and there's a good chance that your customers will help each other solve problems before you have a chance to get to them.
FogBugz even lets you link items in discussion groups to cases, so you can make sure somebody deals with each customer problem, bug report, and feature request.
To learn more about Discussion Groups, see:
What is BugzScout?
BugzScout is a system which allows you to send new bugs directly to FogBugz simply by submitting an HTTP post. This is a great way to automatically report bugs into your database. This article first provides a brief overview, lists the BugzScout-related files included with FogBugz, and then provides some brief descriptions of the basic features that you may find helpful. The BugzScout system is supported on all server platforms that FogBugz is supported on.
See also Get Crash Reports from Your Users - Automatically, an article by Joel Spolsky about gathering crash reports from your customers.
BugzScout allows your program to report bugs back to your FogBugz server. For example, when your code is in beta, you may want to let users send you feature requests, and you certainly want to gather data about crashes.
Included in every FogBugz installation is a URL called scoutSubmit.asp (or scoutSubmit.php on non-Windows installations). This URL is the entry point for automatic bug submissions and is all you need in order to use the BugzScout system. When you need to submit a bug report from the field, you simply create an HTTP post containing the values that scoutSubmit.asp expects to receive, and post that directly to scoutSubmit.asp on your web server.
Your web server must be on a server visible from the Internet. If it is behind a firewall, you can configure that firewall to forward HTTP requests to the FogBugz server. The only file that needs to be publically accessible is scoutSubmit.asp. You may choose to configure your web server so that this is the only file accessible to the world, while keeping all the other files in the FogBugz directory protected.
How Are These Bugs Handled within FogBugz?
Duplicate Bug Submissions - If the description field of a bug submitted via scoutSubmit.asp matches exactly to any existing bug, the following occurs:
- This new submission will be appended to the existing bug's history, and a new bug will not be created in FogBugz. So if one bug is reported by 1,000 copies of your program, only one case will be created in FogBugz for this bug. (You can over-ride that behavior if you set ForceNewBug to 1 or "true".)
- The occurrences field for the existing bug will increase by 1. (The occurrences field of a bug, e.g. "3 occurrences", appears only when there is more than one occurence of that bug.)
- FogBugz will return a status message to the person who submitted the bug. If there is already a case in FogBugz with the same description as this new bug, and that case has a "Scout Message" specified, that message will be returned to the customer. Otherwise, the ScoutDefaultMessage text will be returned to the customer. An example of a default message could be something general like "Thank you, your bug report has been received", or it could contain instructions for a workaround for this bug.
When you edit a bug submitted via scoutSubmit.asp, the case will have two new fields:
- Scout Msg
Type in a custom message to be returned to the next person who submits this same bug, i.e. if and when a bug with the same description is submitted again. You could use this to provide the user with instructions for a workaround for this bug, or tell the user that this bug has been fixed for the next release.
- Scout Will
This controls whether or not future duplicates of this case will be appended to this case. If it is set to "Stop Reports", future submissions with the same description will not be added to FogBugz in any way. "Continue Reporting" simply means that future duplicates will continue to be appended to this case.
Sample Files
In the Accessories directory of FogBugz for Windows there is a file named ScoutSample.zip that contains examples of how to use BugzScout. There is a BugzScout mini-app that submits HTTP posts to scoutSubmit.asp for you (available in both C# and C++ incarnations), and there is ScoutSample (available in both C# and VB) which provides examples of how to use BugzScout. Source files are included for everything, with helpful comments (particularly in the C# files). Click here to see the interface to ScoutSample (VB version shown), with usage tips for the fields involved.
For readability, please make sure your Description field uses a carriage return / line feed line separator. For example, you could do this before submitting the report to BugzScout if you need to get the CRLF in there: Replace(strCrashReport, "\n", "\r\n").
Following is a brief description of the key files and folders in ScoutSample.zip:
.Net/C# version:
- BugzScout.Net\BugzScout
A .Net object version of BugzScout, including C# VS.Net Project source files.
- BugzScout.Net\BugzScout\bin\Release\BugzScoutDotNet.dll
The compiled C# BugzScout .Net object.
- BugzScout.Net\ScoutSample
A C# project that uses the BugzScout .Net object. Use this as an example of how to submit cases to FogBugz from your own code, reporting the stack trace and other helpful information.
- BugzScout.Net\ScoutSample\bin\Release\ScoutSample.exe
Double click on this to see BugzScout in action. This is a simple Windows program that collects information from the user and passes it to BugzScout, which in turn submits the new case to FogBugz.
C++ and VB version:
- BugzScoutCPP
A C++ ActiveX object version of BugzScout including source files.
- BugzScoutCPP\howto.html
Instructions specific to the C++ ActiveX version, and example VB code with documentation.
- BugzScoutCPP\ScoutSample
A VB project that uses the C++ ActiveX object. Use this as an example of how to submit cases to FogBugz from your own code.
- BugzScoutCPP\ScoutSample\ScoutSample.exe
Double click on this to see BugzScout in action. This is a simple Windows program that collects information from the user and passes it to BugzScout, which in turn submits the new case to FogBugz.
HTML example:
- BugzScoutCPP\ScoutSample\scoutsample.html
A sample HTML form which publishes the relevant info to FogBugz. This file explains the different variable arguments to the scoutSubmit.asp file in your FogBugz install. You could customize it to allow users to submit bugs directly through an HTML form.
by Joel Spolsky
I used to work as a developer on the client software for one of the largest American ISPs. Our software was used by literally millions of people. Even the rarest bug had the potential to affect hundreds or thousands of users. Yet I felt extremely confident when we decided to push the button releasing our latest code. I remember telling my dad, "The beta is looking great; yesterday we only had twelve crashes in all of North America."
Twelve, huh? Not, say, thirteen?
Nope. Twelve. We were using an increasingly popular technique of collecting crash reports from the field automatically, and summarizing them in our bug tracking database, allowing developers to find and fix bugs that only happened in the field. These were usually the kinds of bugs we would never have caught in the test lab, since we couldn't possibly reproduce every bizarre PC configuration our customers might have.
This crash detection and reporting is starting to become more common. Now that Internet Explorer and Windows XP have it built-in, customers are starting to expect their desktop software to take care of reporting its own crashes.
The confidence you get from finding out about every crash, anywhere in the world, is crucial to delivering a high quality product that needs to be used in the wild. For those of us in the consumer software business it's absolutely critical. You can't rely on your customers to tell you about crashes—many of them may not be technical enough, and most of them won't bother to take time off of their own important work to give you a useful crash report unless you make it completely automatic.
Now that I have my own company, I'm a big believer in this technique. Virtually all the code we write at Fog Creek Software has some way of reporting errors back to the development team via our FogBugz bug tracking database. That includes code that we ship to customers, such as CityDesk, a Windows application, and FogBugz itself, which is a web-based application that our customers install on their own web servers. Both of them report crashes via the Internet. Even software that we write for internal use only, such as the e-commerce software that runs the Fog Creek online store, notifies the development team if a crash occurs.
Anatomy of a Crash
OK, so your code crashed. In almost every programming environment, there's some way to recover from the crash at a central location. At this point, instead of letting the program die, we display a dialog box (see Figure 1).
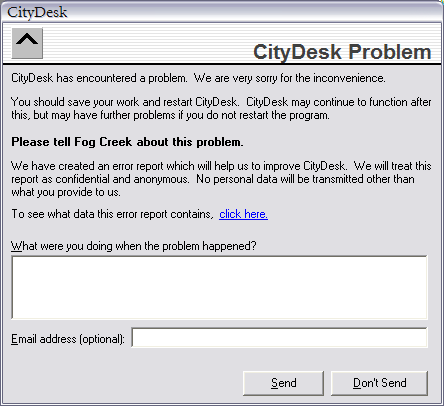
Figure 1: Our automated crash reporting dialog box is short and to the point.
One thing I've learned over the years is that the more questions you ask people, the less likely they are to answer. So we only ask the bare minimum number of questions that we think will help us diagnose the problem. What were you doing? What is your email address? We emphasize that providing an email address is optional, to alleviate privacy concerns. It's amazing what superstitions persist: in the consumer marketplace, there are lots of people who have been taught by the 11 o'clock news never to give out their email address, to avoid spam, and if you require an email address some percentage of these people just won't send in the report.
Almost any other information that you consider important can probably be obtained automatically, for example, what version of operating system they are using, how much RAM they have, etc.
It's important to emphasize the anonymity and privacy of this crash submittal. People working on confidential data may not be willing to submit a crash report if they suspect we're about to upload all their sensitive work, so we provide a link that users can click on to see exactly what we're going to transmit. To avoid even the appearance of impropriety, be careful to tell people about any automatically gathered information that you're transmitting, too.
Collecting Data
The next question is, what data should we collect that will help our developers find the crash? There is a temptation to grab everything. Every bit of system information you can find. The versions of every DLL and COM control on the user's system. Even a complete memory dump (a.k.a. core dump).
After several years working as a developer and never quite knowing what I'm supposed to do with core dumps, I have discovered that collecting this data is not, actually, necessary. Instead, here is the data we collect:
- The exact version of our product
- The OS version and the version of Internet Explorer. (So many parts of Windows are actually provided by Internet Explorer and its components that this is important even for GUI applications.)
- The file and line number in the code where the crash occurred
- The error message, as a string
- A unique numeric code for this type of error
- The user's description of what they were doing
- The user's email address
That's it! Over the years we've found that knowing the exact line of code where the code crashed is enough information to fix almost any crash. For those rare cases where this isn't enough information, you can contact one of the users who experienced the crash via email and ask for any additional information that might help. The benefit of gathering so little information is that the crash reporting process is very fast, making users less impatient. Just checking the version numbers of all the DLLs and COM controls can take quite a while, especially when you factor in the upload time over modems, and very rarely provides useful information. Even if you discover that a certain crash only happens with a certain version of one of Microsoft's system DLLs, what are you going to do about it? You still have to fix the code to work around the crash.
Phoning Home
Thanks to the pervasiveness of the Internet, there's almost always one best way to send the information home: over the web. By sending a standard HTTP request, you will get your bug report past almost any kind of firewall customers may have in place. Virtually every programming environment now has built-in libraries to send an HTTP request and get the response back. For example, on Windows, there are built in functions in the WININET library that use Internet Explorer's network transport code to send an HTTP request and get the response. The best thing about these functions is that even if the user has configured his web browser to go through a proxy server, which is common inside firewalls, the WININET calls will automatically go through the proxy server, with no additional work on your part.
For the response part of the HTTP request, our FogBugz server returns a super short XML file which indicates that the report was received, and includes a message which is displayed to the user. More about that in a moment.
If your application is web based, there's something even easier you can do: display a web page containing a form that submits data to your server. It's as simple as changing the action attribute of the form tag to point to a URL on your bug tracking server. See Figure 2.
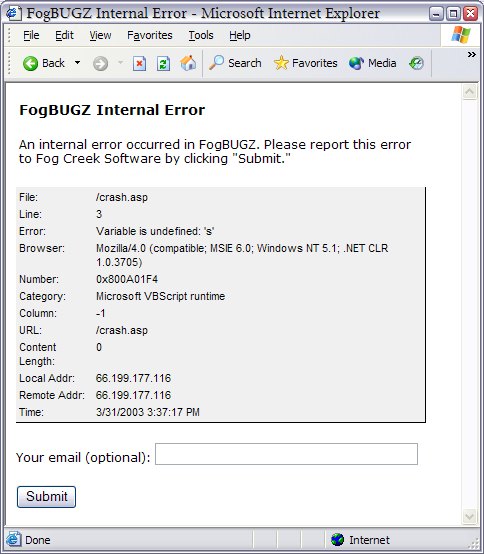
Figure 2: the web page that appears when FogBugz is about to crash. The HTML for this page contains a form which sends the complete crash report to a URL at Fog Creek Software that collects the crash data.
For certain types of applications, instead of sending the crash report right away, you may want to try writing it out to a file or the registry, and then sending it the next time the user launches the program. I call this technique delayed transmission. Although this will delay the report a bit, it has the advantage that if the crash was severe enough that the application is too messed up to transmit a bug report, you'll still get the report.
All crash reports arrive at Fog Creek via a single URL on our public-facing server. Our bug tracking database receives bug reports via this unique URL. In fact that URL is the only public access to our database; everything else is locked out, so people can submit bugs, but they can't get into the database.
Figure 3: What a bug reported by BugzScout looks like in FogBugz. Note the BugzScout-specific fields "Scout Msg" and "Scout Will", shown highlighted.
Figure 3 shows what a bug looks like when it arrives in our database. We could have set it up so that the bug report automatically goes to a designated member of the development team, but these days rather than interrupting one person, we've set up a virtual person called "CityDesk New Bug." Every once in a while when we want to sift through crash reports, we can just search for all bugs assigned to this virtual person, and decide whether to fix them or not. The ones that we decide to fix are then assigned to a real person.
Identifying Duplicate Crashes
An important aspect of automatic crash collection is that the same crash will probably happen many times to many people, and you don't really want a new bug in your database for every duplicate of the crash. We handle this by constructing a unique string that contains key elements of the crash data.
We are careful to construct this string in a way such that two people with the same crash generate the same string. After some experimentation, we found that the best way to do this is to include the error number, file name, function name, line number, and the version of our software in that string. In Figure 3, the unique string is "Error 91 (global:IsRoot:0) V1.0.32". That means error number 91 occurred in the file named global.bas, in the function IsRoot, on line 0, running version 1.0 of the software, build 32. Incidentally, we always use even build numbers for internal builds that we don't send out to customers, and odd build numbers for all builds that go to customers, so I can tell at a glance that this particular crash happened to a developer and not to a customer.
FogBugz will automatically append future crashes with the same unique string to this case, rather than opening a new case. This helps the programmer see all the duplicates of the same crash in one place.
Designing the format of the unique string can be tricky. In the past, we included the entire text of the crash error message in this string. However, we soon discovered that the error message was translated into different languages. So for every crash report, we would find out about it separately in English, German, Spanish, French, and a few other languages I can't identify! We solved that problem by putting the error message in the body of the crash report but only putting the unique error number in the title, which doesn't vary from language to language, so we get far fewer dupes.
We also set up the title in such a way that it can be easily searched for particular problems. Since we use the format filename:function:lineNumber (note the colons) in the title, it's easy to search for bugs in a particular function just by searching for ":function:". We prepend the letter V to our version number for the same reason; you can search for V1 or V1.0 or V1.0.32. If we had left out the V, a search for version 1 would yield every bug report that happened to have a 1 anywhere in the title.
Once the bug is identified, we can change a flag (Scout Will in the FogBugz interface) from "Continue Reporting" to "Stop Reporting" after which future crashes with the same unique string will just get ignored. We can even set a text message (Scout Msg in the FogBugz interface appears for automatically submitted cases) which will be sent back to all users in the future who have this crash. We use this to suggest workarounds when we've found them. Like, "Hey! Next time don't forget to pat your head and rub your tummy before you save!"
One common cause of duplicate reports is when a crash occurs in the crash handling code itself. This doesn't necessarily mean the crash handling code is buggy - it might just be because the original crash has scrambled something so badly that no code can run successfully any more.
Debugging
During beta testing periods, we try to look at each crash report right away. When the user provides their email address, developers can hit the Reply button in FogBugz to send them an email message on the spot if they need additional information. FogBugz automatically keeps a copy of all the correspondence related to this bug, incoming and outgoing, in the bug report itself.
Once the product is shipping and developers are working on the next major release, they usually can't find time to look at every incoming crash report. Instead we tend to wait a few months to see what crashes are most common, and we only work on the crashes that occurred most often. The disadvantage is that you can't really correspond with a user asking questions about a crash they had several months ago: they just won't remember enough details. But I've found that if the same crash has happened several times, inevitably one of the users has given me enough clues about what they were doing that I can repro the bug in the lab. Indeed, it's very rare to know that a given line of code has crashed without having a good idea for what the problem might be, even if it's hard to figure out the repro case. Once I literally worked my way backwards through the code doing arithmetic and using applied logic to figure out repro steps. Hmm, if this is crashing, then this value must be negative. If it's negative, then this IF statement must have been true. And so on, until I figured out what combination of values led to the crash and realized what must have caused them.
Triage
As soon as you build an automatic crash reporting system, you're going to get a pretty steady stream of crash reports. So good triage skills - deciding which bugs are most important to fix, and ignoring the others - are more important than usual.
CityDesk has about 20,000 copies in use and most of our customers tell us it's rock solid, but still we get a couple of crash reports every day, but many of them only happened once. When I investigated these, I usually discover various signs of bugs that we're probably never going to fix. For example:
- The user's computer is failing or has faulty RAM
- The user is experimenting by manually editing our files
- The user is running an old operating system like Windows 95 that is in the advanced stages of crashing
- The user is running our program under severe low memory conditions, possibly with a full disk and full memory
And sometimes, you just can't figure out what caused the crash. Especially with crashes that only happened once. That's life. It's important not to get too bogged down in fixing every crash you see. You can get a lot more bang for the buck by focusing on the common crashes. In fact my policy is that I won't even look at a crash that only happened once. We've got bigger fish to fry. If it's not reproducible in the field, it's not likely to be reproducible in the lab.
Shrink-wrapped Versus In-house Software?
So, now that you've seen what's involved, is crash reporting for you? The answer, to some extent, depends on your user base.
If you're developing shrink-wrapped or consumer software, quality is, quite literally, a competitive advantage. And your software will be running in a hostile environment. Consumer PCs are a mess. No two are the same. They've all got slightly different hardware and software configurations. PC companies ship these things with every imaginable piece of junkware preinstalled. And a lot of consumers gleefully download and install every shiny new object they can get their hands on, including those oh-so-clever utilities that actually inject themselves into the process spaces of other running applications. And most home users don't know enough about computers to keep their systems operating well. In such a hostile environment, automatic crash reporting is the only way to get to the level of quality that the market demands.
On the other hand, if you're developing corporate software for in-house use, you're probably not going to get as much value out of automatic crash reporting. Corporate software is usually written to solve a particular problem, at great expense relative to off-the-shelf software. Once the problem is solved, it's not worth spending any more money on that particular project. If the code crashes once a week, it can be annoying, but there may be no business justification to spend several thousand dollars having a developer fix it. It might be nice but it would not be profitable. Idealistic software developers on in-house projects are often disappointed to discover that as soon as their code is "good enough," their managers tell them to stop working on it. It has solved the business problem, even if the quality could be better, and any marginal work has zero return on investment. Still, many corporate software developers are forced to work literally without any QA or testing staff at all, and automatic crash detection may be the only way to get any kind of bug reports at all.
In conclusion, building a robust system to handle crashes from the field, report them, classify them, and track them will delight your customers and pay for itself many times over in the quality of code that you ship.
How Do I Get This Working With FogBugz?
Included in every FogBugz installation is a file called scoutSubmit.asp (that's scoutSubmit.php in non-Windows versions of FogBugz). This file is the entry point for all automatic bug submissions. You can create an HTTP post with the correct form values and post directly to this file on your web server. Alternatively, you can use our free BugzScout ActiveX control which will package up the values for you and submit them via HTTP to your FogBugz installation. See the this article for more details about the BugzScout files that are included with FogBugz.
Appendix One: Handling Crashes in Visual Basic Code
Because a typical Visual Basic 6.0 event-driven program has so many entry points (one for each event that you handle), the only way to catch crashes which occur anywhere in the code is to add error handling to every function. Here's what all our functions look like:
Private Sub cmd_Click()

		On Error GoTo ERROR_cmd_Click


		' the actual code for the function '

Exit Sub

ERROR_cmd_Click:

		HandleError "moduleName", "cmd_Click"

End Sub
Adding this code can be a pain; luckily there's a utility you can get called ErrorAssist which will add error-trapping code to all your functions automatically. In every case, we just call a global function called HandleError which displays our custom crash dialog. The crash dialog contains the BugzScout ActiveX control. This is a small ActiveX control which comes free with FogBugz, which can be used to transmit bug reports into a FogBugz bug tracking database.
Appendix Two: Handling Crashes in Windows API Code
The Win32 API contains a concept called structured exception handling. When a crash occurs, Windows searches for the current unhandled exception handler function and calls it. If there is no unhandled exception function, it will display the usual user-aggressive "This program has performed an illegal operation" dialog box.
To install your own unhandled exception function, you have to do two things. First, implement your own function of the form
LONG UnhandledExceptionFilter( STRUCT _EXCEPTION_POINTERS *ExceptionInfo );
Then call the SetUnhandledExceptionFilter function, passing in a pointer to your UnhandledExceptionFilter function.
Another way to accomplish the same thing from C++ code is to surround main entry point with a __try/__except clause. Notice the two underlines which cause the compiler to handle structured exceptions which come from low level failures like dereferencing null pointers, not the garden variety C++ exceptions you throw yourself and handle with try and catch.
Search for Using Structured Exception Handling in the Windows Platform SDK or MSDN for more details.
Appendix Three: Handling Crashes in ASP Applications
Microsoft's Internet Services Manager lets you set up a custom error handling page, either HTML or ASP, which is processed for any scripting errors that aren't handled with On Error statements. In particular, when an ASP (Active Server Pages) application crashes or has an unhandled error of any sort, the page is redirected to the error handler for "500;100" errors. In all our applications, we have an ASP page set up to catch 500;100 errors.
That page contains the following key bit of VBScript code:
Set objASPError = Server.GetLastError
Now you'll have an object called objASPError which contains lots of useful data about the crash that just occurred, including the file and the line number.
Sample code for handling ASP errors comes preinstalled on every computer with IIS: look in the \windows\help\iishelp\common directory for a file called 500-100.asp. This simply displays the details of the ASP error to the end-user. Using the 500-100.asp file as a starting point, you can create your own customized message page, containing a form with hidden elements containing the crash data. The form should have an action attribute which submits all the error information to another web page. If you're using FogBugz, you just direct the form to
http://<your FogBugz URL>/scoutSubmit.asp
to open a new case in your bug database.
Note: The latest documentation on FogBugz setup is always maintained at the Fog Creek Website, where you will also find an extensive knowledge base and an online discussion forum.
Learn about setting up the FogBugz server on:
FogBugz lets you group projects by client, which is helpful when you work with multiple clients, each of which may have multiple projects. You can also group projects by department, which is helpful when your team is divided into different departments, each of which may work on multiple projects. Clients and departments are treated in exactly the same way: they're both ways to group projects.
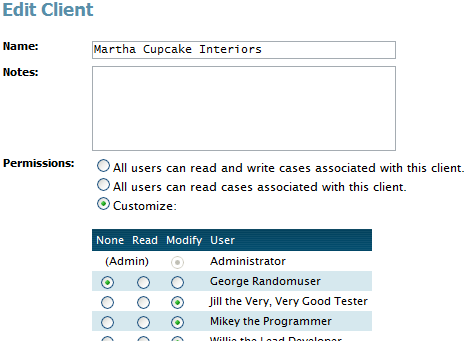
To group projects by client, log on as Administrator and go to the Clients page. Set up your clients. Then edit each project in turn, assigning it to the appropriate client.
To group projects by department, log on as Administrator and go to the Departments page. Set up your departments. Then edit each project in turn, assigning it to the appropriate department.
Each project can be assigned to exactly one client or one department, but not both.
There are two reasons to group projects by client or department:
- Doing so allows you to create a filter which lists all cases for a certain client or all cases in a certain department that you care about.
- User access can be granted on a client or departmental level. This means it will be possible to create FogBugz accounts for your clients such that they can only see their own cases. You can also partition departments so that users can only see cases in their own department. For more about this, see Permissions.
FogBugz allows you to set up permissions (access control) so that only certain users can see or modify certain cases. Before you can start assigning permissions, you need to create a client or department.
Typically, you will use FogBugz access control for two purposes:
- If you have multiple external clients, you can give them all accounts on your FogBugz database without letting them see each other's cases, or even know about each other. When your client logs on to FogBugz, they will only be able to see cases associated with their projects, not with the projects of other clients. They won't even be able to find out about the other clients: they will have no way of seeing cases or users or projects unless you specifically grant them permission.
- If you are using a single FogBugz installation for multiple departments, you can set things up so that users only have permission to see cases in their own department.
FogBugz will give a particular user permission to access all the cases associated with a particular client or department. This means that before you can start assigning permissions, you need to create a client or department.
Example One: A Consulting Firm.
Beverage Gurus Inc. has three clients: Coca Cola, Pepsi, and Tastes Like Tar Cola ("TLT"). Each internal consultant is only allowed to see cases for the client they are working on. Personnel from the client companies are sometimes given accounts on FogBugz. Of course, they can only see cases related to their own projects.
Beverage Gurus does not want their Coca Cola clients to be aware that Pepsi is also a client of Beverage Gurus. Sneaky gurus!
Whenever FogBugz shows a dropdown list of users, it will not include everyone. It will only list users that you might encounter because you share permission to access some client. For example, consultants Alice and Bob are working on the Coca Cola account only, while Mike is working on the Pepsi account only. Normally, Alice and Bob will see each other in the user dropdown, but they'll never see Mike's name in a dropdown list or in a case. So if you make an account for the president of Pepsi in your FogBugz database, this name won't show up in dropdown lists when a Coca Cola client logs on, leading to suspicion, recriminations, lawsuits, and eventually a trip to Camp Cupcake.
But... and this is an important but... if you set up any clients which are visible to all users, this protection is lost. For example, if Beverage Gurus has a fourth client, the local Petting Zoo, and thinks that, heck, the Petting Zoo doesn't have anything confidential, we might as well let everyone in there, they run the risk that a Coke executive and a Pepsi executive will run into each other's names in the user dropdown list, since they share access to the Petting Zoo, and flip out. In summary, if you need to isolate users from one another, you can't have any clients that everyone can access.
Example Two: A Large Company
In a very large company with lots of departments or teams, where each department may work on several projects, it's helpful to divide up the projects according to department, even when there's no security reason to do so. This makes it easy to run filters so that the team management can look at all the cases across an entire department. And if you ever need to set up a secret internal project, you can do so.
Types of Access
When you create a Client or Department, you assign one of the following types of access to each user in FogBugz. This determines, in turn, the access (or lack thereof) that the given user will have to all Projects assigned to the Client or Department you are creating.
- None - The user does not have permission to see or modify cases, or to create new cases.
- Read - The user can read cases, but can't modify them in any way, and can't create new cases.
- Modify - The user can create, read, and modify cases.
When you are editing a client or department in FogBugz, you have three choices:
-
You can give everyone access to the client or department. This is the default.
-
You can give everyone Read access to the client or department, and customize who has Modify access.
-
You can customize access on a per-user basis, deciding individually whether each user has None, Read, or Modify access.
If you choose option #1 or #2 for any client or department, you will not be able to completely, hermetically segregate groups of users from each other, because they can meet each other in that client or department.
Anyone who is configured as a FogBugz administrator will always have permission to read, write, and modify any case, anywhere.
Note that if all you want is for people to be able to submit cases, and be able to view the current status of only the cases they have submitted, this can be achieved by having them send an email to a FogBugz mailbox, or submit to a Project that you have marked as allowing public submissions.
Setting Up Permissions
Setting up permissions is done in four steps:
- On the Site screen, set the Log On Method to "Type email address and password."
- Create the appropriate clients or departments.
- Edit the clients or departments to assign user permissions appropriately.
- Assign each project to the appropriate client or department.
To search for a particular case:
- If you know the case number, enter it in the search box at the top-right of every screen.
- Otherwise, enter your search terms in the box.
- For more search options, just click the "search" button in the top-right corner for a search form.
To search for all cases matching a particular pattern (for example, "all open bugs assigned to Joe Tester,") you need to set up a filter.
If you are using Firefox, you can integrate FogBugz search right into your browser.
Note on Full-Text Search
To implement full-text search, FogBugz relies on the underlying database. If you are using Microsoft Access (Jet) as the database, FogBugz will only be able to search the text of the title of the case.
The syntax of the search phrase depends on the database you are using. To learn about the syntax you can use for searching, simply click Search and FogBugz will show you instructions that are correct for your database.
Every case in the system is given a priority from 1 to 7, where 1 is the highest priority.
You can rename the text labels given to priority 1 through 7 to suit your preferences.
To change the labels:
The best way to use priorities is to have a single, global priority scheme across all your projects, bugs, and features, so that every team member can always work down their list of cases in order of priority.
Here is a typical scheme you might use:
- Life or death emergency... the roof is actually on fire. Drop everything and fix.
- A customer is waiting for this
- Very important
- Important
- Not so important - fix if time
- Probably won't fix but worth remembering
- Do not fix
Setting up Projects
Each installation of FogBugz can be used to keep track of multiple projects. On typical software teams, you will set up a project for every individual product that you develop.
Within each project, you can divide cases into areas. For example, you might have separate areas for the Code and the Documentation of your project.
Any administrator can create and edit projects and areas by clicking on the Projects link in the top menu bar.
Each project has a primary contact. The primary contact is the person whom you've designated to look at cases and assign them to the appropriate person to fix. When someone enters a new case, they usually leave it assigned to the primary contact, the default. (In FogBugz every case is always assigned to one person, so that no case can fall through the cracks.)
If you are working on a large project team, you may want to have several people who help categorize new cases. To do this, we suggest that you set up a virtual user account called "Up For Grabs" and make Up For Grabs the owner of the project. You can use as many email addresses as you want for Up For Grabs, separated by commas, so that a group of people receive an email notification whenever there's a new bug in a particular project. Anyone who wants to help sort through new bugs can create a saved filter on "all cases assigned to Up For Grabs" which they check occasionally (or you can create this filter as a shared filter so that all users can see it).
Choosing Good Areas
In general you'll find that the fewer areas you have, the more likely people are to categorize cases correctly into the right area. Think of it this way: if you have 100 areas, everybody who enters a case is going to have to consider each of those 100 areas to decide which area is the best fit. Inevitably, cases will be miscategorized, and the pain of choosing an area may even make people enter fewer cases. If it's easier to jot down a case than enter it into FogBugz, you're going to lose the benefit of bug tracking.
The recommended approach is to start with just one area, called Miscellaneous, and use it for everything.
Then add areas only after careful consideration and only if they are needed for a particular filter that you want to create. For example, if you have a team of technical writers and they want to be able to see all the bugs in the documentation, create an area called Documentation. Don't create more areas than you need for filters, because the more you have, the more likely cases will be misfiled.
Public Projects
You can set a project to allow public submissions. Then someone who does not have a license, but can reach your FogBugz server, can come along, not log in, and click Enter a New Case. This is what they'll see:

After submitting this case they are given a link that lets them view the current status of the case:

They can bookmark that link and come back at any time to view the status of that case. They will not see the comments that licensed users enter, only the status of the case.
When viewing the status of a particular case, they will be provided with links to view the statuses of all the other cases they've submitted.
If someone sends an email to a FogBugz mailbox, you can set it so that they will be sent a ticket number for their new case. They can then click "Check the status of a case" on the main FogBugz page and enter their ticket number. A ticket number contains random letters, so that people cannot guess other people's ticket numbers, and it allows the submitter to see all cases ever entered using their email address.
Each project in FogBugz can have a list of releases.
For example, each major version of your software is a release, whatever numbering scheme you use: 1.0, 2.0,etc. (Or, if you're insane, you can use a simple and obvious numbering system like 1.0, 2.0, 286, 386, 3.0, 3.1, 3.11, 95, 98, 98SE, Me, XP).
Minor versions will also have releases. For example, a typical software project might have milestones of Alpha, Beta 1, Beta 2, Release Candidate, Gold Release, Service Pack 1, etc:
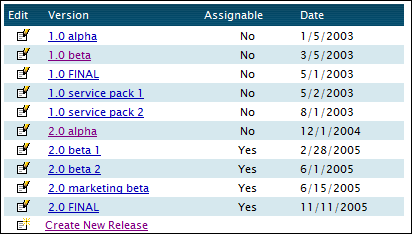
Each milestone has a date; for example, the 2.0 Beta release might be planned for 2/28/2005. You can move the date at will (although your management may be less flexible than FogBugz about changing dates!)
You can set up the list of releases by editing the project. Once you've set up releases for a project, every case in that project can be assigned to a particular release for which you plan to fix this bug or implement this feature. This is sometimes called the "Fix For" of the case.
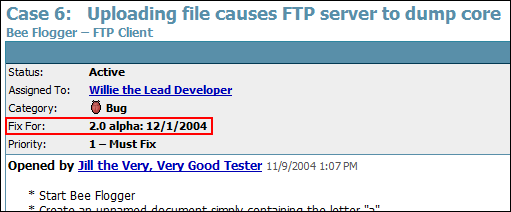
When a certain release is coming up, you can create a filter to see all the features and bugs that need to be fixed for that release.
When you fix a bug or implement a new feature, before you resolve the case, double check that the Fix For is correct; that way it can also be used as an historical record of which bugs were fixed in which release, and which new features were implemented for which release.
FogBugz also lets you maintain and create Release Notes automatically. See Release Notes.
You can also create meaningful releases without dates, for example, "When Pigs Fly" or "Undecided" or "ASAP".
Although releases are normally per-project, you can also create releases that are usable with any project. When you do this, cases in any project can be assigned to that release. For example, some development teams may rerelease all their software every month. FogBugz ships with "Undecided" as a useful default release. You can also use global releases when there is an event coming up by which time certain bugs need to be fixed in a bunch of projects. To edit these global releases, go into any project.
After a release has already shipped, it doesn't make any sense to assign new cases to it. You should set the "Assignable" field of the release to "No" to prevent new cases being assigned to a release that has already shipped, which also makes the "Fix For" dropdown shorter so it's easier to enter new bugs.
The Site screen on the Administrator's toolbar is used to configure installation options for FogBugz.
To learn more about custom settings, read these topics:
When you release that great new version of your software, your customers are going to want to know what's fixed and what new features you're giving them. FogBugz makes it easy to maintain release notes as you go along, effectively attaching a release note to any case.
- Note that you will almost certainly not want to add release notes to every case. Some are too trivial for customers to care about. Others might reflect bugs that were introduced during development and fixed before any customer had a chance to see them, so customers will have no reason to care.
- FogBugz does not attempt to compose release notes automatically based on the bug report, because bug reports are not usually worded the way you want your release notes to be worded: they include insider jargon, abbreviations, etc. Instead FogBugz requires you to create a release note for each bug in your own words.
Once a case is resolved, you can add a release note to it simply by clicking on the link marked Edit Release Notes next to the status of the bug and type in or edit a release note.
To see all the release notes for a particular release (a.k.a "fix for"), go to the main menu of FogBugz by clicking on the FogBugz icon in the top left corner, and choose Release Notes. Choose the release you are working on, and you will see a list of cases that were resolved for that release. From here you can go to any of those cases to write or edit any release note.
At the bottom of this screen, there are two small icons, one marked HTML and one marked XML.
The HTML icon displays all the release notes on one page. It uses extremely clean HTML with all formatting done in a style sheet. You can use your favorite HTML editor to format the release notes any way you like. By editing the styles you can control the formatting of the entire release notes document to match your exact requirements. Here's one example of this output.
The XML icon displays the same thing in XML format, suitable for any further processing you may need to do to integrate the release notes with your web site or documentation or any other electronic interchange or content management system.
When someone reports a bug, it is helpful to report what version of the software they saw the bug in. This might be a shipping version (e.g "2.0 with service pack 2") or it may be a development version ("the build that Harry gave me on 9/5/06").
Every case in FogBugz has a field called Version, which can be used to track this.
There are probably a lot more versions than releases; many programming shops have builds every day and it is helpful in reporting a bug to indicate exactly which build it was found in. That's why the Versions field is just free-form text.
When you enter a new case the default version will be the same as the last case you entered; this way if you are testing a particular version of code and you find lots of bugs you don't have to keep re-entering the version.
- Note: The "versions" field is hidden by default, to simplify bug entry. To un-hide it, log on as an administrator and go to the Site Screen and modify the "Extra Fields".
To help make estimates of when the project will be complete, FogBugz lets you enter an estimate for any case. An estimate is given in days and/or hours. You type it in using the form 1d4h, for example, which means 1 day 4 hours. You don't have to include both parts: 8h is considered equivalent to 1d; 12h is the same as 1.5d or 1d4h.
Note: if your days are not usually 8 hours long, an Administrator can change the length of the day. Click Site and then click on the link to configure the working schedule. For example, if your company is particularly bureaucratic and programmers spend half of their time in meetings, you can configure FogBugz to use 4 hour days, so a "3 day feature" is the same as a "12 hour feature".
You can use 0.25h for a quick, fifteen minute case. The only thing you can't enter is 0, because that is indistinguishible from "no estimate at all."
Using filters, it is easy to search for all the bugs without estimates so you can add estimates.
If you ever change an estimate, the original estimate is remembered next to the current estimate. That is useful if you want to go back to your old bugs and see how good a job you've done estimating in the past, so you can learn to estimate better in the future.
Once you enter a non-zero estimate, you can enter the elapsed time, and FogBugz will automatically calculate the remaining time. For long features which take several days, at the end of every day's work, you can re-enter your current best-guess estimate and the amount of time spent so far.
For an interesting article about successful software schedules, read Painless Software Schedules by FogBugz designer Joel Spolsky.
At the bottom of any list of bugs, FogBugz will always calculate a summary of the estimated time for all bugs shown in that particular list. If you are careful to maintain estimates and elapsed time as you go along, you can use these summaries to get a good approximation of how much work is left in a release.
Optionally, any case can be given a due date and time. This is as easy as clicking on the calendar and choosing a date and time:
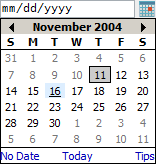
To make it even easier to set due dates, you can simply type certain English phrases in the due date box. When you leave the due date box, FogBugz then tries to interpret what you typed. All of the following examples will be interpreted as expected:
today
tomorrow
the day after tomorrow
in 3 days
in 1 week
tuesday
next friday
march 1
12/30 (or 30.12 outside the USA)
12/30/2006 (or 30.12.2006 outside the USA)
june
In the "time" field you can either enter a time, or type things like:
noon
midnight
now
in 1 hour
in 3 hours
Once you've entered due dates, you can:
-
filter and sort to find cases that are overdue or bugs that will become due in a certain amount of time
-
subscribe to a daily email report sent out every morning listing all past-due cases and all cases which will become due that day. You can subscribe or unsubscribe in the Options screen.
You can set up FogBugz so that incoming email is automatically given a due date, for example, to insure that customers receive a response within one business day. Learn more.
What's an Administrator?
Any FogBugz user can be made into an administrator. You can have as many administrators as you want.
Administrators have the ability to:
- Configure and add users, and change their passwords
- Set up projects, areas, shared filters, clients, and departments
- Configure all aspects of the FogBugz installation
- Install new licenses purchased from Fog Creek
Also, all administrators receive a copy of the email that is sent when users choose Email Your FogBugz Administrators option on the Help menu.
No matter how many FogBugz licenses you have, FogBugz will always let you create one extra user that can be used as an administrator's account. For example, if you purchase licenses for 10 users, you can actually create 11 users. This free admin account is built in; it cannot be deleted, but it can be renamed and transferred to another person.
Importing From Bugzilla
We offer a script for importing bugs from Bugzilla into FogBugz. This file is called importBugzilla.asp on Windows systems and importBugzilla.php on Unix and Mac systems. To get started, bring it up in your browser like this:
Windows: http://YOUR-FOGBUGZ-SERVER/importBugzilla.asp
Unix: http://YOUR-FOGBUGZ-SERVER/importBugzilla.php
Mac: http://YOUR-FOGBUGZ-SERVER/importBugzilla.php
All Other Tools
For those of you looking to import from something other than Bugzilla: The wide variety of database formats in use for the wide variety of bug trackers in existence makes it hard to devise an import feature that could handle all of them. So, to import your data, you would need to use a database tool. The FogBugz database is pretty straightforward with mostly self-explanatory names, so figuring out a one-to-one mapping of the fields from your existing database to ours should not be too hard. We do offer a 90 day no questions asked money back guarantee, so you could try it and if it just isn't working out we will refund your purchase.
If you're using SQL Server, DTS (Data Transformation Services) provides a very intuitive interface for doing this. MS Access has import tools as well. If you're using MySQL, click here for a list of conversion utilities.
For troubleshooting guides please see our online Knowledge Base. We keep the online support pages up-to-date as new issues pop up.
Who and What is "The FogBugz User"?
The FogBugz web application uses one specific Windows user account to take actions via IIS. This account is commonly referred to in short as "the FogBugz user".
Note: If you need to switch this user, or change it's password, you need to know that this user needs the following permissions on the web server:
- Full permissions on the FogBugz folder (and all child objects), normally located here:
C:\Program Files\FogBugz\
- Full permissions on the FogBugz registry key (and all child objects) located here:
HKEY_LOCAL_MACHINE\SOFTWARE\Fog Creek Software\FogBugz\
- You may also be using the FogBugz user in your database connection string.
To determine what Windows account FogBugz is running as within your IIS follow these steps:
- Open IIS (Start > Programs > Administrative Tools > Internet Information Services)
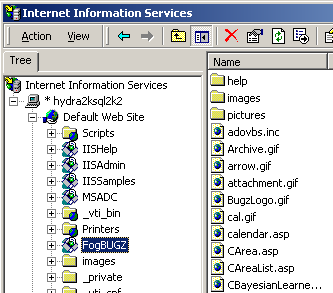
- Right click on your FogBugz directory in IIS and get properties.
If you installed it in your root directory, right click on Default Web Site.
If you installed it as a new virtual directory, right click on that virtual directory.
- In the properties dialogue, go to the Directory Security tab and click Edit for Anonymous Access:
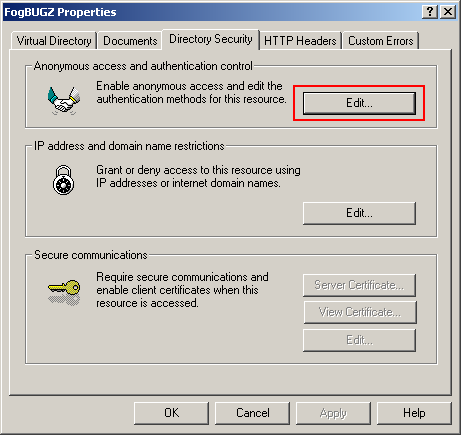
- In older versions of Windows (Windows 2000 screenshot shown below) click Edit for the "Account user for anonymous access". Note that "Anonymous access" should be checked and "Integrated Windows authentication" should not.
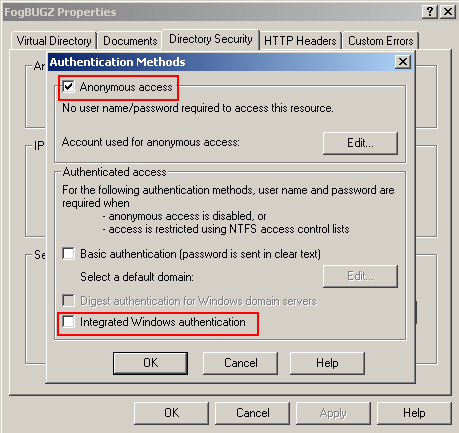
- Make note of the "User name".
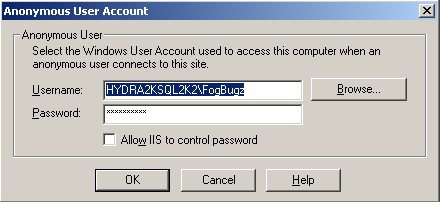
Note: If you do not see Administrative Tools in your Windows Start Menu:
- Right click on the Windows Taskbar and choose Properties.
- Go to the Start Menu tab and click Customize.
- Make sure Display Administrative Tools is checked.
Google, Yahoo, Amazon, etc all come as default searches in Mozilla Firefox.
In a few easy steps, you can integrate Firefox with FogBugz to make searching your FogBugz installation as simple as searching Google.
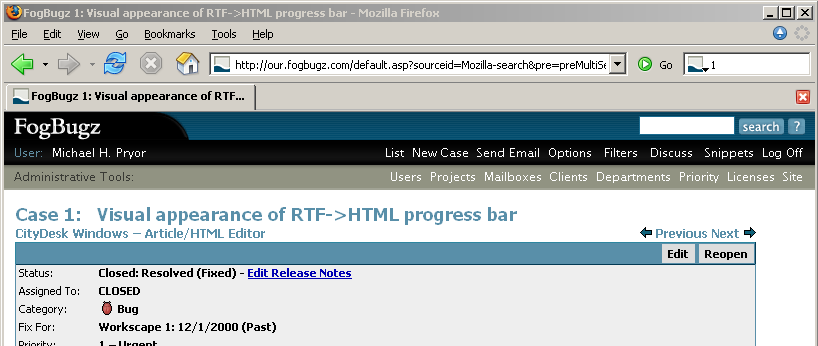
- Download fogbugz.src and fogbugz.png
- Edit fogbugz.src with a text editor and replace the urls to point to your FogBugz install.
- Move fogbugz.src and fogbugz.png to your Mozilla searchplugins folder and restart Firefox
Linux: /usr/lib/Mozilla/searchplugins
Windows: C:\Program Files\Mozilla Firefox\searchplugins
Mac: /Applications/Mozilla.app/Contents/MacOS/Search\ Plugins
- Now you can type either a bug number or a search term in the Firefox dropdown and you are all set.
- To learn more about search plugins for Firefox, visit http://mycroft.mozdev.org/
- Future versions of FogBugz will allow you to single click install this from the Options page.
FogBugz 5.0 has keyboard shortcuts to make case handling faster and easier: there's no need to reach for the mouse.
Just press Ctrl+; (hold down Ctrl and press the semicolon key) on any page, and little yellow tags will appear over each action with its shortcut:

You can:
-
Press the key shown to perform the action,
-
Press Ctrl+; again to rotate through different sets of keyboard shortcuts,
-
Or press Esc tomake the tags go away.
When you're looking at the list of cases, press Ctrl+; to go into keyboard mode and use the cursor keys (Up, Down, Home, End, Page Up, and Page Down) keys to select a case. Once you've selected a case press Enter to view it.
-
In some browsers, such as Firefox and Internet Explorer 6, Alt+; can be used as an alternative to Ctrl+;.
-
On non-English keyboards, try Ctrl+, (comma) or Ctrl+` (backtick).
-
In some browsers, such as Opera, the arrow keys are not accessible. You may also use j and k to navigate up and down within a list.
FogBugz displays a picture of the day, which appears on the FogBugz home page and in the list of bugs if you're in List View mode.
These pictures are rotated daily from a selection found in the website\pictures subdirectory of your FogBugz installation on the server. You can replace those pictures with your own selection. Each picture should be 196 pixels wide but can be any height.
HTTP compression can drastically improve FogBugz performance by reducing the amount of bandwidth consumed for each page load. Enabling HTTP compression is easy for both IIS and Apache, and you'll find that your FogBugz pages are reduced to approximately 10% of their original size. You will pay a slight penalty in increased server CPU load, but we think that the tradeoff makes HTTP compression a no-brainer.
IIS 5
Download the free tool available at http://sourceforge.net/projects/flatcompression (follow the links to download FlatCompression...you want to download FlatComp-R-1.20.226.dll.zip). FlatCompression's extended documentation is available, but you should only need to follow the simple steps below.
- Unzip FlatComp-R-1.20.226.dll and place it in C:\Windows\system32\inetsrv
- Go to Control Panel | Administrative Tools | Internet Information Services
- Expand "Local Computer", right-click on "Web Sites", and click Properties
- Click the "ISAPI Filters" tab, click Add, and enter "FlatCompression" as the filter name.
- Browse to C:\Windows\system32\inetsrv\FlatComp-R-1.20.226.dll for the executable.
- Click Ok, restart IIS.
IIS 6
IIS 6 ships w/ support for HTTP compression, but you need to take a couple configuration steps. Scott Forsyth's walkthrough is the best detailed explanation we've found. Follow his three simple sections (Enable Compression in IIS, Create a Web Service Extension, and Now for the metabase changes), and you should be all set.
Apache
If your PHP is built with zlib, then adding compression should be as simple as adding the following line to your php.ini, and restarting apache:
zlib.output_compression = On
There are a couple of caveats; for instance, this won't work with ob_gzhandler. For a fuller explanation, check out http://php.net/zlib. If you're not sure whether or not your PHP is built with zlib, you can create a test script as shown here: http://www.fogcreek.com/FogBugz/KB/trouble/fogutil.soProblems.html, and look in the "Configure Command" section.
That's it! Your compression should be up and running, and if you keep an eye on your network traffic you'll notice that individual requests consume significantly less bandwidth.
Before starting, check that your system meets the minimum system requirements:
FogBugz for Windows System Requirements
Then run FogBugz Setup, which is mostly self-explanatory:
Running FogBugz for Windows Setup
If you have any trouble or need to customize the FogBugz setup, we have a detailed description of exactly what setup does, for advanced system administrators:
What Setup Does
For further help please contact Fog Creek Software. Our programmers will be happy to help you and we even have the ability to remote control your server using VNC techology and get FogBugz installed for you.
FogBugz Online Support
Before installing FogBugz for Windows, you should run through this checklist to make sure your server has all the required components.
Computer
Any Pentium-class computer will probably be fine for most teams. We've run databases with over 100 users off of a single Pentium II/266 MHz. We recommend at least 512 MB of memory for optimal performance.
Operating System
FogBugz for Windows works on the following operating systems:
Windows 2000
Windows XP Professional
Windows Server 2003
Windows NT 4.0 No Longer Supported
We no longer support Windows NT 4.0. FogBugz 4.x and above have not been tested with Windows NT 4.0.
Windows 2000
FogBugz is compatible with Windows 2000 Professional, Server, Advanced Server, or Datacenter. You should also make sure you have the following components, which Microsoft distributes free:
-
VBScript version 5.6 or later (download
here).
-
Internet Information Services (a part of Windows 2000). If it is not installed you may install it from Start | Control Panel | Add or Remove Programs | Add or Remove Windows Components.
Windows XP
FogBugz is compatible with Windows XP Professional Edition but not Home Edition. You need to install IIS, which is not installed by default. If it is not installed you may install it from Start | Control Panel | Add or Remove Programs | Add or Remove Windows Components.
Windows XP Professional has a 10 concurrent connection limit. See the EULA for XP pro, under 1. Grant of License: Installation and Use.
Windows Server 2003
FogBugz is compatible with Windows Server 2003. Using the "Manage Your Server" application, click "Add or remove a role" and insure that the "Application Server" role is turned on.
Data Access Libraries
We recommend installing the latest version of Microsoft's Data Access components ("MDAC"). We test FogBugz extensively with MDAC version 2.6. You can find the latest version of MDAC on Microsoft's web site by going to http://www.microsoft.com and entering MDAC in the search box.
Web Server
FogBugz for Windows runs on the IIS (Internet Information Services) web server, which is a component of Windows. Other web servers in Windows are not supported.
Database
You have three choices:
-
Microsoft Jet (4.0sp3)
-
-
Microsoft SQL Server (7.0, 2000, 2005)
Microsoft Jet is available for free from Microsoft and is good enough for small teams using FogBugz. It works fine for up to about 10 users. It does not support full text search.
Jet is preinstalled on Windows 2000 and later, so you don't have to install Jet. The latest version is available from Microsoft's web site; go to http://www.microsoft.com and enter Jet in the search box.
MySQL is an extremely popular open-source database available for free from MySQL AB. MySQL supports full text search. Download and install from http://www.mysql.com/. See http://www.fogcreek.com/FogBugz/KB/dbsetup/UsingMySQL-2.html for more information.
Microsoft SQL Server is a commercial, industrial strength database which will scale to virtually any size software team. It requires a license from Microsoft, and makes FogBugz work faster and more reliably on larger teams. SQL Server supports full text search.
Our recommendations: If you can afford it or already have a Microsoft SQL Server license, use Microsoft SQL Server. For very small teams or casual bug tracking, use Jet. Otherwise, use MySQL.
For Email Integration
To send email, you need an SMTP server. If you have the ability to send Internet email, you probably already have one of these somewhere. There is also a free SMTP server included in Microsoft's Internet Information Server (IIS).
For FogBugz to receive incoming mail, you need a POP3 server. FogBugz supports plain POP3 and secure (ssh-based) POP3. Virtually all email servers support POP3.
For Source Code Control Integration
We support Subversion, Perforce, CVS, Visual SourceSafe, and Vault. If you are not already using source code control tools, we recommend Subversion (open source) for small or medium projects, and Perforce (commercial and rather expensive) for extremely large projects.
Other source code control systems can be used if they support some form of triggers and have a web interface, although you will have to write a small script. More info.
Setting up FogBugz on a Windows server is as easy as double-clicking the FogBugz-Setup-Version.EXE file that we distribute and following the instructions on screen.
FogBugz setup uses a wizard interface to walk you through the setup one step at a time. At any point you can cancel, and it will roll back any changes you have already made.
There are a few command line options to the setup program, documented here.
When you run FogBugz setup, if anything goes wrong during the main phase (in which you see a progress indicator), after the error message is displayed, FogBugz Setup gives up and rolls backwards.
There are command-line arguments to the Setup EXE program which can be used to ignore errors and continue anyway:
/sqlserveronly
This will tell Setup to only install the SQL Server components. This is useful if your SQL Server machine is a different machine than your IIS machine and they are not on the same domain (i.e. there is no trusted relationship between them). If Setup reports permissions errors within SQL Server and cannot continue read this for how to use the /sqlserveronly option.
/ignoreiiserror
When you run FogBugz Setup, it tries to call the AppCreate function in your web server, which is a standard feature of IIS that allows automated web application setup as opposed to manual web application setup. The AppCreate function creates the FogBugz website as an application in IIS.
- If IIS in your OS does not support this function (as is sometimes the case in older versions of Windows), you need to use the /ignoreiiserror option to instruct Setup to continue even if it can't create the virtual directory in IIS.
- You will then need to manually create a virtual directory in IIS and map it to the FogBugz\website directory, following the steps under the IIS Settings header in this article.
/ignorepermissionserror
This will allow Setup to continue even if it can't set permissions for the FogBugz account (that you specify during Setup) to access the FogBugz directory. You will need to grant full permission for the FogBugz user account to access the FogBugz directory manually.
This document describes the complete list of steps that the FogBugz Setup program takes to install FogBugz. It is intended to help you with troubleshooting, or for advanced system administrators who need to know what changes will be made to their system, or in unusual situations where you need to install something manually. But please do not try to install FogBugz manually. FogBugz Setup is very smart and only takes a couple of minutes. Doing this all by hand would take you hours and is bound to be frustrating.
FogBugz Setup is a self-contained, single executable file that installs everything you need to run FogBugz on a Windows server. It can be used to upgrade from FogBugz 2.0, 3.0, or older versions of 4.0.
Setup is completely reversable until you get to the last screen and click Finish. If you cancel at any point in time all changes that were made before then are undone.
Setup never requires a reboot. While files are being copied, it temporarily stops three services:
- W3SVC, the web server
- CISVC, the Content Indexing Service
- FogBugz's own Dispatcho or Maintentance service (during an upgrade)
This is to minimize the chances that any FogBugz files are in use while you run Setup and cannot be overwritten. If a file is still in use, Setup will simply not succeed and changes will be rolled back.
If you get errors when you run Setup: To force Setup to ignore certain errors and continue anyway, there are command line options.
Check System Requirements
The operating system is checked to make sure it is one of these:
- Windows 2000
- Windows XP Professional
- Windows 2003 Server
- or later.
Internet Information Services (IIS) is checked by checking if the file iisadmin.dll has major version 4 or later. If you have Windows NT 4.0 you will have to install the Windows Option Pack to get IIS 4.0. Fog Creek Software no longer supports Windows NT 4.0, and FogBugz has not been tested on that version of the operating system. Note: if you do not have IIS, you will still be able to choose the "Just extract FogBugz files" install option described below.
MDAC (Microsoft Data Access) is checked to make sure that you have version 2.6 or later. You can install MDAC from Microsoft's web site at http://www.microsoft.com/data.
VBScript is checked to make sure that it is version 5.6 or later. You can install Microsoft Windows Script from their web site at http://www.microsoft.com/scripting.
Install Files
The Setup program offers an option that only extracts files without making any other changes. If all else fails you could choose this option to get the FogBugz files out and set everything up manually. You still have to pass the "system requirements checking" phase to get this far, but no changes are made to the system except for extracting files.
Files are extracted, by default, to c:\Program Files\FogBugz, although you can use any directory on a locally attached hard drive, which must be formatted using NTFS. Do not use FAT drives, network attached storage (NAS) devices, or Linux/UNIX SAMBA shares, because they do not support user-level permissions on files.
FogBugz Setup creates two important subdirectories, Website and Accessories. Website contains the FogBugz source code itself, and it's the one that IIS will serve out. Accessories contains everything else that ships with FogBugz.
Create an Account
The FogBugz application will need a Windows account for its operations. This account will be used for the anonymous access account in IIS, for the FogBugz Maintenance Service, and will map to a login in SQL Server (if you use SQL Server). FogBugz Setup asks you if you want to use an existing account or have Setup create an account for this purpose. If you choose the latter, it will be named "FogBugz" unless you specify another name.
On Windows 2003, the FogBugz account is added to the IIS_WPG group.
See this guide for complete instructions on granting user permissions and configuring IIS settings.
The FogBugz account is granted the following five user rights:
Adjust memory quotas for a process
Allow log on locally
Log on as a batch job
Log on as a service
Replace a process level token
IIS Settings
A virtual directory is created in IIS which points to the FogBugz Website folder.
(By default this is C:\Program Files\FogBugz\website)
The following settings are made in the IIS metabase. All but the last one, UploadReadAheadSize, can be set using the IIS management console (Internet Information Services Manager).
- An application is created for this directory. By default it is named FogBugz.
- Access flags are set to read only/scripts only, Directory browsing is disabled.
-
- IIS Properties dialogue > Virtual Directory tab (or Home Directory tab if using root folder):
Read should be checked off. The following should not be checked off: Script source access, Write, Directory Browsing. Execute Permissions should be "Scripts only".
- The following are set to TRUE: AspAllowSessionState, AspBufferingOn, EnableParentPaths, AspSessionTimeout is set to 60 minutes.
-
- Virtual Directory tab > click Configuration > App Options tab:
These should all be checked: Enable session state (set to 60 minutes), Enable buffering, Enable parent paths.
- The default document is set to default.asp.
-
- Authorization is set to Anonymous account ONLY.
-
- Directory Security tab > Edit... Anonymous Access:
"Anonymous access" should be checked off, "Integrated Windows authentication" should not.
- The account for anonymous access user and password are set. By default this is the "FogBugz" user account.
-
- AnonymousPasswordSync is set to FALSE.
-
- "Allow IIS to control password" must be un-checked.
- The 500;100 error handler (Windows 2000 and later) is set to internalError.asp.
-
In IIS 6.0 only:
The following setting is changed, which cannot be accessed using the IIS console:
- UploadReadAheadSize is set to 0x40000000
To modify this setting, which is required for file uploads to work correctly in FogBugz, you will need to modify the IIS MetaBase directly. For IIS 4 and 5, you will need an application available from Microsoft called the MetaBase editor (MetaEdit). The IIS 6 metabase is a plain-text XML file; click here for instructions on configuring it.
Application Pools (IIS 6.0 on Windows Server 2003 Only)
A new application pool is created for FogBugz, and set to run under the FogBugz account. The application pool is started and the FogBugz virtual directory is set to run in that application pool.
Component Services
In the Component Services control panel, the process associated with FogBugz is set to run under the identity of the FogBugz account.
Open Port 80 in the Firewall
If you are running the Microsoft Firewall, which comes with Windows XP Service Pack 2 or later, and port 80 is blocked, Setup will create an exception in the firewall configuration to allow incoming connections on port 80, the port used for web access (HTTP).
Register OCX controls
All DLLs and OCX files in FogBugz\Accessories are registered. Run register.bat in the accessories folder to do this.
Install Dart Control Licenses
In HKEY_LOCAL_MACHINE\SOFTWARE\Dart\PowerTCP\License, we create license keys. For the specific license keys please contact Fog Creek Software. The FogBugz account is granted full control of this key.
Initialize Registry Settings
In HKEY_LOCAL_MACHINE\SOFTWARE\Fog Creek Software\FogBugz, we create a key with the name of the FogBugz Website directory, with all backslashes changed to forward slashes, for example, c:/Program Files/FogBugz/website. If you have multiple FogBugz installations in different directories, each can have its own registry settings. In that key, we create the following default values, which are all strings (even the ones that look like numbers are strings.)
sRegistryVersion=3
sReplyEmail=FogBugz@example.com
sSMTPServer=NONE
sCVSView=default.asp?pg=pgInvalidSourceControl
sCVSDiff=default.asp?pg=pgInvalidSourceControl
fPasswordEnable=0
fRememberMeAllowed=1
fAnybodyCanCreateAccounts=0
cbUploadMax=1024000
fDemo=0
sLocale=*
sConnectionString=a valid OLE DB connection string to the FogBugz database
sURL=your FogBugz url (e.g., http://localhost)
fFullTextSearchOK=1 (if SQL Server with Full Text Search or MySQL is installed, 0 otherwise)
Most of these settings can be controlled by FogBugz administrators from the Site Configuration screen once FogBugz is up and running.
Grant Permissions For the FogBugz Account
The account is granted permissions. The following permissions are granted, and all are set up to "inherit" to child containers.
- Full control of the FogBugz directory and all subdirectories.
- Full control of the registry key HKEY_LOCAL_MACHINE\SOFTWARE\Fog Creek Software\FogBugz
Create the Database
For SQL Server, a file in the Accessories directory called all.sql contains the SQL code that you need to create a blank FogBugz database. For MySQL there is a file called mysql.sql.
For Access, a file in the Accessories directory called FogBugz.MDB contains a blank FogBugz database. Simply copy this file.
SQL Server Permissions
We set up accounts and permissions inside SQL Server using integrated Windows security, so that the FogBugz account has full control over the FogBugz database.
If you are doing this manually: create a login in SQL Server. Make it a SQL Server login, not a Windows login. It just needs to be owner of the FogBugz database, nothing more than that. Then use this login in your connection string (specified in registry settings above) like so: uid=newlogin; pwd=newpassword
Update the Database Schema
If you are doing a manual setup, you do not need to do anything here. When you bring up FogBugz in the browser, the ASP code will handle this. To find out what the setup program does, read on.
Whether you are upgrading or installing a new database for the first time, the database schema may be out of date. FogBugz Setup connects to the FogBugz installation over http and requests that the ASP code bring the database schema up to date, adding tables, columns, and indexes that have been added since the version of FogBugz that you currently have.
On a fresh install, the database starts out empty except for a tiny "version" table which indicates that the database is version 0. On an upgrade, you may have the current database schema, or you may have a schema from an earlier version of FogBugz.
Here's what Setup does:
-
Connects to the URL setupUpgradeDB.asp?action=upgrade&sUpgradeKey=random string
-
This URL attempts to upgrade the database to the latest version. If anything goes wrong, it rolls the database back to its previous state and returns a page of the form -|error message . If it is successful, it returns a page containing simply +|.
-
If the rest of Setup succeededs, Setup connects to the URL setupUpgradeDB.asp?action=commit&sUpgradeKey=same random string to commit the changes.
-
If the rest of Setup fails, Setup connects to the URL setupUpgradeDB.asp?action=rollback&sUpgradeKey=same random string to roll back the database to the previous version.
Until the database is brought up to date, anyone logging into FogBugz will see a message that FogBugz is down while it is being upgraded.
FogBugz Maintenance Service
In the accessories folder is a Windows service called FogBugzMaint. SETUP installs and starts this service. It runs under the FogBugz account and is always running.
FogBugzMaint is used to perform maintenance tasks which need to be run even when nobody is using FogBugz such as nightly cleanup tasks and receiving incoming email. Whenever FogBugz has something to do which might take a while, like Bayesian filter training or sending an outgoing email, instead of doing it right away, it creates a maintenance task and waits for FogBugzMaint to wake up and do it. This ensures that the FogBugz user interface always responds quickly. Read more details about the FogBugz Maintenance Service.
To install FogBugzMaint manually: In a command prompt, navigate to your FogBugz/accessories folder and type this at the command line:
FogBugzMaint.exe install username password
Username is your FogBugz Windows account, and should look like SERVERNAME\FogBugz.
In situations where the access permissions in your environment are such that Setup will not be able to log in to your SQL Server and/or grant the FogBugz user account permissions in your database:
- Run Setup on the web server, choosing Access as the database. (You can just delete the FogBugz/Accessories/fogbugz.mdb file later.)
- Install just one of your license orders and log in as Administrator. Don't bother with any other settings right now.
- Find the FogBugz/Accessories/all.sql file. This is a SQL script that creates a skeletal FogBugz database.
- Open SQL Server Enterprise Manager, left click on the FogBugz database, go to Tools at the very top, and choose Query Analyzer. Go to File > Open and open the all.sql file. Run it (you can hit F5 to run it).
- Back in Ent. Mgr. go to Security > Logins and create a login for FogBugz to use. You must set it to use SQL Server Authentication, not Windows Auth. Make this login db_owner for the FogBugz database.
- Back in FogBugz in the browser, click on Site, top right. Scroll down about half way, and change the database to point to your SQL Server database. FogBugz will at this time prompt you to let it upgrade that database.
- Lastly, run regedit on the web server and go to:
HKLM > Software > Fog Creek Software > FogBugz > C:\\path\to\your\FogBugz
Set fFullTextSearchOK to 1. This turns full text search on in FogBugz. (Full text search is disabled when you use Access as your database.)
Before starting, check that your system meets the minimum system requirements.
FogBugz for Unix System Requirements
Then set up FogBugz using the instructions listed here:
FogBugz for Unix Setup
If you have any trouble or need to customize the FogBugz setup, we have a detailed description of exactly what setup does, for advanced system administrators:
What Setup Does
For further help please contact Fog Creek Software. Our programmers will be happy to help you and we even have the ability to log onto your server using ssh or telnet to get FogBugz installed for you.
FogBugz Online Support
Before installing FogBugz for Unix, you should run through this checklist to make sure your server has all the required components. If you are missing anything, we maintain a list of helpful links and advice.
NOTE: If you are planning to install this on a shared Unix host, it will require command-line access and possibly root access unless the host environment already matches all of the listed requirements. Ask your host provider before installing if they will be amenable to helping you with making the installation work.
Computer
FogBugz for Unix runs on 100% Intel-compatible computers (386, 486, Pentium, etc.) and Sun SPARC. Other CPUs will not work. Please contact Fog Creek Software first if you need to run FogBugz on any other server.
Operating System
Note: Some operating systems now come loaded with experimental ZTS (Zend Thread Safety). FogBugz is not compatible with ZTS, so you will need to disable ZTS in PHP before installing FogBugz.
Supported operating systems:
|
PHP 4.x
|
PHP 5.0
|
PHP 5.1
|
| Debian |
 |
|
|
| FreeBSD 5.1-5.4 |
|
|
|
| Fedora Core 3 ,4 |
|
|
|
| Gentoo |
|
|
|
| Mac OSX PPC |
|
|
|
| Mandrake |
|
|
|
| RedHat 8, 9 |
|
|
|
| Solaris 8, 9, 10 on Sparc |
|
|
|
| Suse 8,9 |
|
|
|
| Ubuntu |
|
|
|
- Red Hat and Fedora (pre-install help)
- Red Hat Linux 8 and 9: Officially supported.
- Red Hat Enterprise Linux 3: Not supported, because we have not tested it. Two RHEL 3 users we have talked to were able to install FogBugz, one user was not.
- Red Hat Enterprise Linux 4: Not supported, because we have not tested it. (For a binary compatible FogBugz shared object, use the FC3 .so that we ship.)
- Fedora Core 2: Not yet supported since we have not yet tested it in-house, but FogBugz has been easily installed on Fedora Core 2 with no problems by a couple of customers.
- Fedora Core 3: Officially supported
- Fedora Core 4: Officially supported
- SuSE Linux 9.0 (pre-install help)
- Debian Linux (pre-install help)
- Debian Linux 3.0r1, 'Sarge', and 'Etch' are all supported, except for the Unstable releases of 'Sarge.'
- Ubuntu Breezy Badger and Dapper Drake (pre-install help)
- Mandrake Linux 9.2 - Mandriva Linux 2005 (pre-install help)
-
FreeBSD 5.1 - 5.4 (pre-install help)
- FreeBSD 5.3 comes loaded with ZTS (Zend Thread Safety). Disable this in PHP and you should be fine.
- FogBugz does not run on FreeBSD 4.x and earlier.
- You must install both the php package and the php extensions package.
- Gentoo (pre-install help)
- Gentoo is a meta-distribution, so we cannot support every possible configuration. A 2004 or 2005 profile with no modifications that affect binary compatibility is supported.
- Apache must be emerged WITHOUT the threads option so that PHP does not build with ZTS (Zend Thread Safety)
- Solaris 8, 9, and 10 (pre-install help)
64-bit Linux users: Some users have reported success in running FogBugz on 64-bit Linux systems with Apache, PHP, and FogBugz running in a 32-bit chroot environment. However, this is not yet a supported configuration for FogBugz.
Other versions of Linux that are binary compatible with these may work, but we have not yet tested them (aside from comments included in the above list). We do offer a 90-day, no questions asked money back guarantee, so if you like, you could buy one license, try installing, and if it does not work, we will issue a refund. However, we cannot currently provide installation support for platforms not on the list of supported platforms.
Please contact us to let us know about platforms you'd like us to support in the future.
If your platform is not currently supported, we may be able to compile our FogBugz shared object to that platform if you give us SSH access with permissions to compile. Contact us for further details. Platforms for which we have tried this include OpenBSD 4.
Not sure what platform you have? Type
uname -a at the command prompt.
Apache HTTP Server
www.apache.org
Must be installed and running.
Version required: 1.3 or 2.0.
Not sure if Apache is running? The easiest way to tell if Apache is running on your server is to point a web browser at it. For example, from the command line, type lynx http://localhost
Not sure what version you have? If apache is running, the command apachectl status will usually tell you what version you have. Or you can try to download a page that doesn't exist, which will display an error message containing the version of Apache. For example, type lynx http://localhost/xxxx
PHP Scripting Language
www.php.net
Must be installed with the following extensions compiled in, or available as extensions:
Must be installed without the debug and ZTS options.
Make sure safemode=Off in your php.ini file or the install will not be able to run.
Version required: PHP 4 or 5
For security reasons nothing older than version 4.3.10 is supported.
Not sure if it's installed? Create a file named test.php in a directory which is served by your web server. Copy the following text into that file:
<?
echo PHP_VERSION . "<br>";
echo "XML:" . extension_loaded('xml') . "<br>";
echo "imap:" . extension_loaded('imap') . "<br>";
echo "mysql:" . extension_loaded('mysql') . "<br>";
echo "iconv:" . extension_loaded('iconv') . "<br>";
?>
Now browse that new page with a web browser, for example, lynx http://localhost/test.php
-
If you see either the PHP source code itself, or your web browser offers to download the file to you, this means your HTTP server is not configured to run PHP files. See the PHP documentation for instructions on configuring Apache to run PHP files.
-
If PHP files are running, you will see the php version in the first line. Check that it is 4.3.10 or later.
-
The next three lines tell you whether php was compiled with xml, imap, and mysql support, respectively. If they are, you will see the number 1 after the colon. For example:
4.3.10
XML:1
imap:1
mysql:1
iconv:1
If any line is missing the 1, that means that this extension is not compiled into PHP and FogBugz will not work.
PHP Command Line Interface (CLI)
http://ca2.php.net/manual/en/features.commandline.php
Must be installed. This is a version of the PHP scripting language which runs from the command line.
The following extensions must be compiled in:
Must be installed WITHOUT the debug and ZTS options.
Version required: PHP 4 or 5
For security reasons nothing older than version 4.3.10 is supported.
Not sure if it's installed? The command php -v will try to run it and tell you what version you have.
Not sure if you have all the right extensions compiled in?
Issue the command
php -m
(On some systems, php may be named php4. In this case you can make a symbolic link from php to php4.)
Look for xml, imap, and mysql in the list of extensions. If any one of these is missing, you will need to recompile or configure PHP to include the appropriate extensions.
pear must also be in your path or in /usr/local/php/bin/pear. Type which pear to find out whether your path includes the pear binary.
MySQL Database Server
www.mysql.com
Client and Server must be installed and running.
Version required: 4.0 or later
On MySQL version 5.0.25 and later and FogBugz 5.0.19, you will have to configure MySQL with strict mode deselected for the installer to work.
Not sure if it's installed and running? Type mysql at the command line.
-
If you get "command not found," you probably don't have mysql installed, or it might not be in your path.
-
If you get "Can't connect to local MySQL server," it's possible you only have the client installed, or it could be that the server (mysqld) is simply not running.
-
If you get "Welcome to the MySQL monitor" you're probably in good shape. It should also tell you what version you're running.
-
Try typing use test; at the mysql prompt. If you get the message Database changed you are definitely in good shape. Type quit to exit.
Curl Command line tool
curl.haxx.se
Must be installed.
Not sure if it's installed? Type curl --version at the command line. If it is installed, you will see a version number. If you get the message "command not found," install curl.
eAccelerator PHP optimizer and cache
eaccelerator.net
Recommended. Radically improves performance of PHP FogBugz.
Not sure if it's installed?
Issue the command
php -m | grep eAccelerator
- If you get no results, eAccelerator is not installed
You can find download and installation instructions on the eAccelerator install page. Binary packages are available for most operating systems.
For Email Integration
For FogBugz to send email, you need an SMTP server. If you have the ability to send Internet email, you probably already have one of these somewhere.
For FogBugz to receive incoming mail, you need a POP3 server. FogBugz supports plain POP3 and secure (ssh-based) POP3. Almost all email servers support POP3.
For Source Code Control Integration
We support integration with Perforce, CVS, Subversion, Visual SourceSafe, and Vault. Other source code control systems may work if they support some form of triggers and have a web interface. More info.
Fog Creek Software has collected this list of tips, tutorials, and links to help you install the software packages that are required by FogBugz for Unix. In some cases we provide links to outside web sites, for which we cannot be responsible. Please email us if you find any broken links or if you have any additional tips we can add to this page.
One way to install the required packages is to download the source code and compile it all. For detailed instructions on how to download and install Apache, SSL, MySQL, and PHP from source code, check out this article at DevShed:
The Soothingly Seamless Setup of Apache, SSL, MySQL, and PHP
By Israel Denis Jr. and Eugene Otto
http://www.devshed.com/c/a/PHP/The-Soothingly-Seamless-Setup-of-Apache-SSL-MySQL-and-PHP/
There's often an easier way, though: many varieties of Unix include their own proprietary package managers, such as "apt" on Debian, "rpm" on Red Hat and Mandrake, or the Ports Collection on FreeBSD. The rest of this page is organized by supported operating system:
Red Hat Linux 8.0 and 9.0
Fedora Core 3 and 4
Red Hat Linux provides a graphical Package Management Tool which allows you to install and uninstall groups of related packages. To run the Package Management Tool, type the command redhat-config-packages at the command prompt.
You can also install packages individually using the tool rpm, available on all Red Hat systems. It takes a single file ending with the extension .rpm which corresponds to a chunk of precompiled functionality and installs it on your system. A good place to find the rpm files you need is on the site http://rpmfind.net, a search engine for rpm files.
For our own testing of FogBugz on Red Hat Linux, we installed the following rpms:
| RedHat 8 |
PHP needs to be built from source because FogBugz requires php 4.3.10 due to a PHP security vulnerability, and the rpms for RH8 only go up to php 4.2.2 |
| RedHat 9 |
PHP needs to be built from source because FogBugz requires php 4.3.10 due to a PHP security vulnerability. |
| Fedora Core 2 and 3 |
Use yum to get the latest versions of mysql, mysql-server, php-4, php-imap-4, php-mysql-4, and httpd-2. See this post for more info regarding setting up Fedora Core 2. |
| Fedora Core 4 |
Use yum to get mysql, mysql-server, php-5, php-imap-5, php-mysql-5 and httpd-2 |
Mandrake Linux 9.2 - Mandriva Linux 2005
Mandrake Linux 9.x allows you to install software packages using the tool rpm. It takes a single file ending with the extension .rpm which corresponds to a chunk of precompiled functionality and installs it on your system. A good place to find the rpm files you need is on the site http://rpmfind.net, a search engine for rpm files.
With Mandrake 10 and Mandriva distributions, you can use the urpmi tool to install packages easily from distribution CDs or "cooker" sites.
SuSE Linux 9.0 / 9.1
Please see the SuSE website for more information for Suse 9.0.
For Suse 9.1
Dont trust the RPMs...
- Make sure Apache 2 has apache2-devel installed. This adds "apxs2" which is needed for php
- Compile PHP using APXS & the host of required modules
- Go find libstdc++6 as an RPM (rpmfind.net works, the platform doesn't matter)
- Install the RPM
- Restart apache
- Party
Debian Linux 3.0r1, 'Sarge', and 'Etch'
Ubuntu Linux 'Breezy Badger' and 'Dapper Drake'
The Debian and Ubuntu Linux distributions use a system called APT. By issuing the apt-get command you can download and install any packages you are missing. Before starting, issue the command apt-get update so that APT can figure out the latest version of every package is.
For a tutorial on APT:
http://www.linuxgazette.com/issue84/tougher.html
In setting up the test system at Fog Creek Software, we installed the following apt packages:
PHP 4:
apt-get install apache2 libapache-mod-php4 php4-cli php4-imap php4-mysql php4-pear curl mysql-server mysql-client php4-dev libstdc++5
PHP 5:
apt-get install apache2 mysql-server-5.0 libapache2-mod-php5 php5-cli php5-imap php5-mysql php5-mysqli curl libstdc++5
Gentoo Linux
Gentoo Linux uses a system called portage to manage a tree of common open source packages. You can use the emerge tool to retrieve and build the packages you need to run FogBugz.
Emerge Apache without threads (-threads).
Emerge mod_php without debug but with apache2, imap, mysql, and xml2 (-debug +apache2 +imap +mysql +xml2).
Emerge mysql and curl with the standard options.
FreeBSD 5.1 - 5.4
Before installing any other software, you'll want to make sure you have the Ports Collection installed. For more information on obtaining the Ports Collection, see this topic in the FreeBSD Handbook:
http://www.freebsd.org/doc/en_US.ISO8859-1/books/handbook/ports-using.html
Once you have the Ports Collection on your server, you can install many software components (including everything you need for FogBugz) just by going into the appropriate directory and typing the appropriate "make" commands.
An excellent tutorial on setting up a FreeBSD server to run Apache, MySQL, and PHP is located here:
http://www.devx.com/opensource/Article/17534/0/page/1
Solaris 8, 9, and 10 on SPARC
Solaris ships with Apache and Mysql.
PHP builds are currently GNU and Linux-centric. A short guide to building and installing PHP and mod_php on Solaris can be found here:
http://www.bolthole.com/solaris/php+solaris.html
NOTE: Remember to build PHP with xml, imap, mysql, and iconv
Binary packages for other necessities, such as Curl and libiconv, can be found here:
http://www.sunfreeware.com/
Finally, you may need libstdc++.so.2.10.0 in your /opt/sfw/lib if it's not already there. Here's a gzipped build of it:
http://www.fogcreek.com/libstdc++.so.2.10.0.gz
To install FogBugz for Unix on your server:
- Log on as root or issue the su command. (Root user is not fully necessary, e.g. if you are having FogBugz hosted remotely.)
- Before you start, you'll need to know three things about your system. Figure these out and make a note of them:
The group under which Apache runs (?)
The location of your Apache web server configuration file (?)
The location of your php.ini configuration file (?)
- Uncompress the tar.gz file which you downloaded in the directory where you want FogBugz to live. We recommend /opt.
$ mv FogBugz-setup-php-*.tar.gz /opt
$ cd /opt
$ tar zxf FogBugz-setup-php-*.tar.gz
$ cd FogBugz
- Run the install.php script:
$ php -d output_buffering=0 -f install.php
Note: that's a zero, not the letter O. When I started programming, we had to do everything with just zeros and ones, and sometimes we couldn't even afford ones.
(Advanced system administrators can read the details of exactly what the setup program does to install FogBugz.)
- When this has completed, launch your web browser and navigate to http://localhost/fogbugz/install1.php
- When you have finished setting up FogBugz, remember to set up the FogBugz Maintenance Service.
This document describes what the install.php script does when you install FogBugz for Unix. It is intended to help system administrators understand how the script modifies their system, and should help you understand how FogBugz is set up so that you can diagnose and correct problems. Although we don't recommend setting up FogBugz manually, it is possible to do so by following the instructions in this document.
0. Understanding the File Layout
When you untar FogBugz you'll see three directories. Website contains the PHP source code and is the only directory which is served up by your web server. FileUploads was used by FogBugz 2.0 and 3.0 to hold copies of files which have been uploaded as bug attachments; now, in FogBugz 4.x and above, these files are moved to the database. If you are upgrading these files will trickle into the database slowly, although this is completely transparent. The Accessories folder contains any and all other sundry files shipped with FogBugz .
For security reasons, neither FileUploads nor Accessories should be in a directory that is served by the web server!
1. Install Certain PHP Modules
The script uses PEAR, the "PHP Extension and Application Repository," to install the latest versions of four PHP modules. (pear must be in your path. 'which pear' will tell you if it is or not). The versions shown below in parentheses are the versions we tested at the time FogBugz for Unix was released; later versions will probably work but have not necessarily been tested.
Mail_Mime (1.2.1)
XML_Tree (2.0b2)
Auth (1.2.2)
Auth_SASL (1.0.1)
2. Add a Custom PHP Module, fogutil.so
FogBugz relies on a small custom PHP module called fogutil.so to provide certain functionality. This module, shipped in the Accessories directory, is a binary file compiled for your particular operating system.
We do not ship the source to this file. This is the reason that your system needs to be on the approved list of Unix variants in order to run FogBugz.
fogutil.so is copied to the php modules directory, then chmod'ed to 755. The install script adds the line extension=fogutil.so to the php.ini file, a change which will probably require that you restart Apache.
3. Setting Permissions
The install script sets ownership and permissions for various files and directories so that the user account under which Apache is running has permission to access everything it needs:
chgrp apache FileUploads
chmod g+rw FileUploads
touch Accessories/application.data
chmod g+rw Accessories/application.data
chgrp -R apache Website Accessories
chmod -R g+r Website Accessories
chmod +x Accessories/fogbugzmaintd
4. Adding a Directory to httpd.conf
Apache is configured so that the http://.../FogBugz URL points to ../Website/default.php on disk by adding this section to the httpd.conf file:
Alias /FogBugz "/path/to/FogBugz/Website"
<Directory "/path/to/FogBugz/Website">
Options
AllowOverride All
DirectoryIndex default.php
</Directory>
5. Restart Apache
The install script attempts to restart apache to get it to reload its settings and php extensions.
Issue the command ps -aux | grep httpd. This will list the web server processes running on your system. The first column contains the username of the account under which the processes are running.
Type groups username to determine the group.
For Apache 1.x, issue the command httpd -V
For Apache 2.x, issue the command httpd2 -V
Look for the variable HTTPD_ROOT and combine that with SERVER_CONFIG_FILE. For example, if HTTPD_ROOT is "/etc/httpd/2.0" and SERVER_CONFIG_FILE is "conf/httpd2.conf" then your configuration file should be located at /etc/httpd/2.0/conf/httpd2.conf. Double check that the file exists.
Issue the command php -i | grep php.ini
FogBugz requires a daemon, the FogBugz Maintenance Service, to be running at all times to perform certain routine maintenance tasks. (About the FogBugz Maintenance Service). The FogBugz Maintenance Service is known on Unix as fogbugzmaintd.
Upgrading from FogBugz 3.0 for Unix or Mac?
If you are upgrading FogBugz 3.0 for Unix or Mac, you are already running a daemon called dispatchod. You should remove this daemon now; it is replaced by fogbugzmaintd.
Setting up fogbugzmaintd
-
Log on as root or issue the su command
-
Start fogbugzmaintd now:
$ cd (your FogBugz directory)
$ cd Accessories
$ ./fogbugzmaintd start
-
Add it to your server's startup scripts so it starts automatically when your server is rebooted. The way to do this is, sadly, different on every variety of Unix.
Macintosh OS X (Installer AUTOMATICALLY does this part):
Look in the Accessories folder inside your FogBugz directory. There is a folder there called MacFogBugzMaint. As root, copy this folder into the /Library/StartupItems directory:
$ sudo cp MacFogBugzMaint /Library/StartupItems
Red Hat or Mandrake/Mandriva Linux:
Add a line to the bottom of your /etc/rc.local file:
(your FogBugz directory)/Accessories/fogbugzmaintd start
Gentoo Linux:
Create this init file in the /etc/init.d directory, named fogbugzmaintd:
#!/sbin/runscript
start() {
	ebegin "Starting fogbugzmaintd"
	(your FogBUGZ directory)/Accessories/fogbugzmaintd start
	eend $?
}
stop() {
	ebegin "Stopping fogbugzmaintd"
	(your FogBUGZ directory)/Accessories/fogbugzmaintd stop
	eend $?
}
restart() {
	ebegin "Restarting fogbugzmaintd"
	(your FogBUGZ directory)/Accessories/fogbugzmaintd stop
	(your FogBUGZ directory)/Accessories/fogbugzmaintd start
	eend $?
}
Make the script executable:
$ chmod +x fogbugzmaintd
And add it to the runlevel:
$ rc-update -a fogbugzmaintd default
Debian Linux or Solaris
Create this shell script in your /etc/init.d directory, named fogbugzmaintd:
#!/bin/sh
NAME=fogbugzmaintd
DAEMON=(your FogBugz directory)/Accessories/$NAME
SCRIPTNAME=/etc/init.d/$NAME

# Gracefully exit if FogBugz has been removed.
test -x $DAEMON || exit 0

case "$1" in
  start)
	$DAEMON start
	;;
  stop)
	$DAEMON stop
	;;
  restart|force-reload)
	$DAEMON stop
	sleep 1
	$DAEMON start ;;
  *)
	echo "Usage: $SCRIPTNAME {start|stop|restart}" >&2
	exit 1
	;;
esac

exit 0
Make the script executable:
$ chmod +x fogbugzmaintd
And add it to the runlevels:
Debian: $ update-rc.d fogbugzmaintd defaults
Solaris: $ ln -s /etc/init.d/fogbugzmaintd /etc/rc3.d/S55fogbugzmaintd
SuSE Linux:
Add a line to the bottom of your /etc/init.d/boot.local file:
(your FogBugz directory)/Accessories/fogbugzmaintd start
FreeBSD:
Create this short shell script in your /usr/local/etc/rc.d directory, named fogbugzmaintd.sh:
#!/bin/sh
(your FogBugz directory)/Accessories/fogbugzmaintd start
Make the script executable:
$ chmod +x fogbugzmaintd.sh
Before starting, check that your system meets the minimum system requirements:
FogBugz for Macintosh System Requirements
Then set up FogBugz using the instructions listed here:
FogBugz for Macintosh Setup
If you have any trouble or need to customize the FogBugz setup, we have a detailed description of exactly what setup does, for advanced system administrators:
What Setup Does
For further help please contact Fog Creek Software. Our programmers will be happy to help you and we even have the ability to log onto your server using ssh or telnet to get FogBugz installed for you.
FogBugz Online Support
You can just run setup and setup will tell you if you are missing any system component pre-requisites. This guide covers all the details of those pre-requisites needed in order for a setup to succeed.
If you are missing anything, we maintain a list of helpful links and advice.
To open a window in which you can type commands on the "command line", launch the Finder, click Applications, go to the Utilities folder, and double click Terminal. You will need this in the following steps.
Your Computer
FogBugz for Macintosh runs on PowerPC Apple Macintosh computers running Mac OS X version 10.3 (Panther) or later. Please contact Fog Creek Software first if you need to run FogBugz on any other server. Note: As of FogBugz 5.0.25, Intel Macs are supported.
Your Web Server
Personal Web Sharing must be enabled.
Launch System Preferences, and click Sharing. There should be a check mark next to "Personal Web Sharing". If it is not checked, check it - this starts the Apache web server in OS X.
To verify that the web server is indeed running correctly, click this link: http://localhost and you should see a page (it may say "If you can see this, it means that the installation of the Apache web server software on this system was successful", that's a default page that comes with Apache).
PHP Apache Module
You can download this for OS X here: http://www.entropy.ch/software/macosx/php/
Must be installed with the following extensions compiled in:
Must be installed without the debug and ZTS options.
Version required: PHP 4 or 5
For security reasons nothing older than version 4.3.10 is supported.
Not sure if it's installed? Open TextEdit and paste in the following text:
<?
echo PHP_VERSION . "<br>";
echo "XML:" . extension_loaded('xml') . "<br>";
echo "imap:" . extension_loaded('imap') . "<br>";
echo "mysql:" . extension_loaded('mysql') . "<br>";
echo "iconv:" . extension_loaded('iconv') . "<br>";
?>
Save this file as "test.php" and put it in your Sites folder.
Now browse to that new page with a web browser, for example to http://localhost/test.php
-
If you see either the PHP source code itself, or your web browser offers to download the file to you, this means your HTTP server is not configured to run PHP files. See the PHP documentation for instructions on configuring Apache to run PHP files.
-
If PHP files are running, you will see the php version in the first line. Check that it is 4.3.10 or later.
-
The next three lines tell you whether php was compiled with xml, imap, and mysql support, respectively. If they are, you will see the number 1 after the colon. For example:
4.3.11
XML:1
imap:1
mysql:1
iconv:1
If any line is missing the 1, that means that this extension is not compiled into PHP and FogBugz will not work.
PHP Command Line Interface
Must be installed. This is a version of the PHP scripting language which runs from the command line.
The following extensions must be compiled in:
Version required: PHP 4 or 5
For security reasons nothing older than version 4.3.10 is supported.
Not sure if it's installed? The command php -v will try to run it and tell you what version you have.
Not sure if you have all the right extensions compiled in? Issue each of these commands in turn. Each one will either print the number 1 to indicate that the extension is loaded, or it will not print anything in which case the extension is not loaded.
php -r "echo extension_loaded('xml');"
php -r "echo extension_loaded('imap');"
php -r "echo extension_loaded('mysql');"
php -r "echo extension_loaded('iconv');"
If any of these commands does not print 1 you will need to recompile or configure PHP to include the appropriate extensions.
'pear' must also be in your path or in /usr/local/php/bin/pear. Type 'which pear' to find out whether your path includes the pear binary.
More info: http://us2.php.net/manual/en/features.commandline.php
MySQL Database Server
Client and Server must be installed and running.
NOTE: The version of MySQL that comes with Mac OS X SERVER is broken. It yields incorrect results for SELECT COUNT queries. If you are running the default Mac OS X SERVER edition, you will need to reinstall MySQL from http://www.mysql.com . You can use the mysqldump command to back up your databases.
Version required: 4.0 or later
More info: http://www.mysql.com
http://docs.info.apple.com/article.html?artnum=303225 provides advice on how to improve MySQL performance on versions of Mac OS X Server before 10.4.7.
Not sure if it's installed and running? Type mysql at the command line.
-
If you get "command not found," you probably don't have mysql installed, or it might not be in your path.
-
If you get "Can't connect to local MySQL server," it's possible you only have the client installed, or it could be that the server (mysqld) is simply not running.
-
If you get "Welcome to the MySQL monitor" you're probably in good shape. It should also tell you what version you're running.
-
Try typing use test; at the mysql prompt. If you get the message Database changed you are definitely in good shape. Type quit to exit.
Curl Command Line Tool
Must be installed.
Not sure if it's installed? Type curl --version at the command line. If it is installed, you will see a version number. If you get the message "command not found," install curl.
More info: http://curl.haxx.se/
For Email Integration
For FogBugz to send email, you need an SMTP server. If you have the ability to send Internet email, you probably already have one of these somewhere.
For FogBugz to receive incoming mail, you need a POP3 server. FogBugz supports plain POP3 and secure (ssh-based) POP3. Almost all email servers support POP3.
For Source Code Control Integration
We support integration with Perforce, CVS, Subversion, Visual SourceSafe, and Vault. Other source code control systems may work if they support some form of triggers and have a web interface. More info.
Fog Creek Software has collected this list of tips, tutorials, and links to help you install the software packages that are required by FogBugz for Mac. In some cases we provide links to outside web sites, for which we cannot be responsible. Please email us if you find any broken links or if you have any additional tips we can add to this page.
The Soothingly Seamless Setup of Apache, SSL, MySQL, and PHP
By Israel Denis Jr. and Eugene Otto (DevShed)
http://www.devshed.com/Server_Side/PHP/SoothinglySeamless/
A great source of Unix server software for Macintosh OS X:
http://www.entropy.ch/software/macosx/
MySQL can be installed from
http://www.entropy.ch/software/macosx/mysql/
http://docs.info.apple.com/article.html?artnum=303225 provides advice on how to improve MySQL performance on versions of Mac OS X Server before 10.4.7.
PHP with IMAP can be installed from
http://www.entropy.ch/software/macosx/php/
Warning: After installing this version of PHP you may also still have the default Apple install of PHP on your system. Please make sure that when you type 'which php' it is using the entropy installed PHP (under /usr/local/php) and that your httpd.conf is using the entropy installed libphp4.so (under /usr/local/php).
An article about using OS X as a web server:
http://www.macdevcenter.com/pub/a/mac/2001/12/07/apache.html
To install FogBugz for Macintosh on OS X server, double click on the .dmg file that you downloaded, and double click on the package inside that (it looks like a box). You will be guided through setup step by step.
- The first part of setup is GUI-based.
Advanced system administrators can read the details of exactly what the setup program does to install FogBugz.
- When this has completed, your web browser will be launched to finish setup.
- When you have finished setting up FogBugz, remember to set up the FogBugz Maintenance Service.
This document describes what the install.php script does when you install FogBugz for Macintosh. It is intended to help system administrators understand how the script modifies their system, and should help you understand how FogBugz is set up so that you can diagnose and correct problems. Although we don't recommend setting up FogBugz manually, it is possible to do so by following the instructions in this document.
0. Understanding the File Layout
When you untar FogBugz you'll see three directories. Website contains the PHP source code and is the only directory which is served up by your web server. FileUploads was used by FogBugz 2.0 and 3.0 to hold copies of files which have been uploaded as bug attachments; now, in FogBugz 4.x and above, these files are moved to the database. If you are upgrading these files will trickle into the database slowly, although this is completely transparent. The Accessories folder contains any and all other sundry files shipped with FogBugz .
For security reasons, neither FileUploads nor Accessories should be in a directory that is served by the web server!
1. Install Certain PHP Modules
The script uses PEAR, the "PHP Extension and Application Repository," to install the latest versions of four PHP modules. (pear must be in your path. 'which pear' will tell you if it is or not). The versions shown below in parentheses are the versions we tested at the time FogBugz for Mac was released; later versions will probably work but have not necessarily been tested.
Mail_Mime (1.2.1)
XML_Tree (2.0b2)
Auth (1.2.2)
Auth_SASL (1.0.1)
2. Add a Custom PHP Module, fogutil.so
FogBugz relies on a small custom PHP module called fogutil.so to provide certain functionality. This module, shipped in the Accessories directory, is a binary file compiled for your particular operating system.
We do not ship the source to this file. This is the reason that your system needs to be on the approved list of Unix variants in order to run FogBugz.
fogutil.so is copied to the php modules directory, then chmod'ed to 755. The install script adds the line extension=fogutil.so to the php.ini file, a change which will probably require that you restart Apache.
3. Setting Permissions
The install script sets ownership and permissions for various files and directories so that the user account under which Apache is running has permission to access everything it needs:
chgrp apache FileUploads
chmod g+rw FileUploads
touch Accessories/application.data
chmod g+rw Accessories/application.data
chgrp -R apache Website Accessories
chmod -R g+r Website Accessories
chmod +x Accessories/fogbugzmaintd
4. Adding a Directory to httpd.conf
Apache is configured so that the http://.../FogBugz URL points to ../Website/default.php on disk by adding this section to the httpd.conf file:
Alias /FogBugz "/path/to/FogBugz/Website"
<Directory "/path/to/FogBugz/Website">
Options
AllowOverride All
DirectoryIndex default.php
</Directory>
5. Restart Apache
The install script attempts to restart apache to get it to reload its settings and php extensions.
FogBugz does almost all its work through the web, via a web-based interface. That means that FogBugz code won't run until a user requests a web page in their browser.
Typically, web-based interfaces have two problems:
- Operations which take a long time make the user wait and result in a non-responsive UI
- Operations can only be initiated when a user hits a web page; that makes it impossible to perform routine tasks, for example, deleting old spam at midnight or sending out the morning escalation report via email.
To address these issues FogBugz requires the FogBugz Maintenence Service (informally known as "the heartbeat") to be running at all times. This service's entire job is to wake up every few seconds and hit a web page, specifically, heartbeat.asp (heartbeat.php on non-windows installations). That web page checks if there's any maintenance work to be done, and, if there is, does it.
The FogBugz Maintenence Service is responsible for the following tasks:
- Receiving incoming email via POP3.
- Sending outgoing email from the FogBugz outgoing mail queue (a table named MailQueue) using SMTP.
- Performing the Bayesian learning algorithm, which can be slow, after someone has reclassified an email message or discussion group topic.
- Deleting old spam messages permanently
- Sending the daily email escalation report to any subscribers
If any of these tasks are not happening, it may be because the FogBugz Maintenence Service is not running. If the page heartbeat.asp has not been hit for a long time, FogBugz takes this as a sign that something is wrong with the FogBugz Maintenence Service and reports an error to the next administrator who logs on.
When the Maintenence Service goes to the page heartbeat.asp, heartbeat.asp picks a single task from its list of outstanding work and performs it. Then it checks if there is more work. If there is, it returns + to the Maintenence Service. If there is no more work, it returns - to the Maintenence Service.
The Maintenence Service then goes to sleep for a while so as not to hog all the CPU time. Here's how long it sleeps:
- If there was no additional work, it waits 15 seconds.
- If there is additional work to be done, it waits as long as the previous request took. For example if the previous request took 4 seconds to complete it will wait 4 seconds. This is intended so that the Maintenence Service never bogs down the system with routine tasks that can safely be delayed.
- Under no circumstances will the Maintenence Service sleep for more than 2 minutes.
HTTP compression can drastically improve FogBugz performance by reducing the amount of bandwidth consumed for each page load. Enabling HTTP compression is easy for both IIS and Apache, and you'll find that your FogBugz pages are reduced to approximately 10% of their original size. You will pay a slight penalty in increased server CPU load, but we think that the tradeoff makes HTTP compression a no-brainer.
IIS 5
Download the free tool available at http://sourceforge.net/projects/flatcompression (follow the links to download FlatCompression...you want to download FlatComp-R-1.20.226.dll.zip). FlatCompression's extended documentation is available, but you should only need to follow the simple steps below.
- Unzip FlatComp-R-1.20.226.dll and place it in C:\Windows\system32\inetsrv
- Go to Control Panel | Administrative Tools | Internet Information Services
- Expand "Local Computer", right-click on "Web Sites", and click Properties
- Click the "ISAPI Filters" tab, click Add, and enter "FlatCompression" as the filter name.
- Browse to C:\Windows\system32\inetsrv\FlatComp-R-1.20.226.dll for the executable.
- Click Ok, restart IIS.
Note (IIS5 and IE6 only): if you enable IIS5 FlatCompression and use an old minor version of Internet Explorer 6, you may occassionally receive javascript errors due to a bug in this older IE. Running Windows Update on the client machine or just getting a newer version of IE6 will resolve the issue (in particular, this bug has been confirmed on IE 6.0.2600.0000.xpclient.010817-1148 with no updates).
IIS 6
IIS 6 ships w/ support for HTTP compression, but you need to take a couple configuration steps. Scott Forsyth's walkthrough is the best detailed explanation we've found. Follow his three simple sections (Enable Compression in IIS, Create a Web Service Extension, and Now for the metabase changes), and you should be all set.
Apache
If your PHP is built with zlib, then adding compression should be as simple as adding the following lines to your (your fogbugz install)/Accessories/fogbugz.conf, and restarting Apache:
php_flag zlib.output_compression On
php_value zlib.output_compression_level 1
There are a couple of caveats; for instance, this won't work with ob_gzhandler. For a fuller explanation, check out http://php.net/zlib. If you're not sure whether or not your PHP is built with zlib, you can create a test script as shown here: http://www.fogcreek.com/FogBugz/KB/trouble/fogutil.soProblems.html, and look in the "Configure Command" section.
That's it! Your compression should be up and running, and if you keep an eye on your network traffic you'll notice that individual requests consume significantly less bandwidth.
You can set up as many discussion groups as you want by logging on as an administrator and clicking Discuss.
Each discussion group contains the following configuration options:
Full Name - a complete name for the discussion group which will appear as a headline
URL Name - a short name for the discussion group which lets you make a simplified URL people can use to access the discussion group. For example, if your URL name is cats and your web server is running at http://fogbugz.example.com, this discussion group will be located at http://fogbugz.example.com/?cats (notice the question mark).
Tagline - a brief description of the discussion group, which will appear below the headline. May contain HTML tags.
Sidebar - text which will appear in the left-hand sidebar of the discussion group. May contain HTML tags. This can be used to make links to other popular locations, to provide guidelines and FAQs, or for a picture of your cat.
Posting Guidelines - text which will appear right below the message text entry field telling people some basic rules for posting to the discussion group.
Days on Home Page - A number determining how many days worth of topics will be listed on the main page. For busy discussion groups, use a low number like 7 to keep the main page manageable. For new discussion groups, 30 is a good start. Anything older than this number of days will disappear from the main page (although it will still be visible in the archive).
Sort Posts - determines whether FogBugz will automatically attempt to delete posted spam and hold suspicious posts for moderator approval. More about moderation
Open to Public - determines whether you need to be logged onto FogBugz to participate in the discussion group. Of course, your FogBugz server needs to be on a public-facing website on the public Internet.
As soon as you open a discussion group to the public you're likely to see two things:
- Spam. Spammers are getting good at posting advertisements and other spam to public discussion groups as soon as they find them, even rarely used discussion groups on quiet corners of the Internet with no visitors. They often try to post URLs to their own web site in hopes of improving the Google PageRank™ of those URLs.
- General abuse, ranging from personal abuse to copyright violations to merely off-topic posts.
Everyone who is logged onto FogBugz as an administrator will be able to moderate discussion groups, removing abusive posts and spam. Over time, as you moderate groups manually, FogBugz AutoSort will learn from your moderation and try to mimic what you did. For example, if it sees that you keep deleting posts from a certain IP address, or posts containing a certain word, it will learn to delete those automatically. That way the post is deleted before it even appears.
FogBugz AutoSort is not 100% reliable, and sometimes it will be suspicious about a post but not certain that it needs to be deleted. In this case it will merely hold it for approval. A post which is held for approval will not appear to the outside world until a moderator clears it.
Note: FogBugz AutoSort can be turned on or off for each discussion group. By default, it is on.
Whenever a post has been deleted, the original person who made that post will still see it if they log on from the same IP address or the same web browser. This technique helps reduce the number of people who become furious at having their precious post deleted and try to disrupt the discussion group in other ways.
As the moderator deletes posts, undeletes posts, and approves posts which were held for approval, FogBugz AutoSort will learn from those actions. Over time, it will become more adept at recognizing the signs of bad posts.
FogBugz uses the following tactics, among others, to prevent spam:
- It does not allow Google or other search engine spiders to follow links in the discussion group to outside URLs, so posting an outside URL will not increase the Google PageRank of that URL.
- It does not allow new replies to topics which have already scrolled off the home page, so spammers cannot hide spam in old messages which the moderator is unlikely to see.
- It uses FogBugz AutoSort, the same extremely effective spam filtering technology used for removing spam from incoming email.
- It prevents users from finding out that their message was blocked or deleted. If spammers notice their spam is being blocked, they will try to work around the block and try to repost their spam using different words. However since FogBugz continues to show even deleted messages to the IP address range of the person (if spammers are people) who posted it, it's very hard for spammers to even find out that their spam is being removed.
Read our advice on successful moderation.
As your discussion community grows, it becomes increasingly likely that you will find a small number of disruptive users. Whether out of malice, boredom, or greed, somebody will try to abuse your discussion system. As soon as you delete their posts, they will immediately appear under another name complaining about censorship and prattling about their First Amendment right to advertise sex aids and talk about politics on your software discussion board. Inevitably, this will bring in a chorus of naive but well meaning users quoting Voltaire who didn't see the porn ad that got deleted, but they sure know they are against censorship.
You may find this whole thing to be fun, or you may just find it a boring distraction from real work. If left unchecked, like Usenet, any public discussion group will rapidly accumulate a significant amount of spam and "noise." The noise itself will drive away the best users and the signal to noise ratio will worsen. As Clay Shirky, a researcher at New York University, says, "A group is its own worst enemy."
To address these issues:
- Moderate your discussion group regularly.
- Don't delete things merely because you disagree with them; reserve the DELETE button for things which are really off topic or abusive. Although FogBugz tries to prevent people from finding out that their posts were deleted so they won't launch into a full-scale attack, a small percentage of your users will have access to the discussion group from different IP addresses, so they will discover that their posts are being deleted and become even more disruptive.
- Help train FogBugz AutoSort whenever possible. It's always better if a post is deleted instantly by FogBugz AutoSort before anyone sees it, because it reduces the number of people who even notice that moderation is taking place and launch into predictable rants about censorship.
- Train FogBugz AutoSort to delete any posts that are about deleted posts, censorship, etc. They are off topic and sure to stir people up, and if you don't do this, you'll keep repeating the conversation about censorship every three weeks as new users join in, which will eventually bore the old users, driving the good users away from the discussion group and attracting the bad ones.
To learn more, read Building Communities with Software by FogBugz designer Joel Spolsky.
FogBugz allows you to customize virtually every aspect of the visual appearance of the discussion groups so as to match your corporate website exactly. However, this customization requires some skill with HTML and CSS.
To customize the appearance of discussion groups, log on as administrator and go to the Discuss screen. At the bottom of the page you'll see a link to customize the appearance.
Customization is done by wrapping the discussion group in HTML which goes before and after the discussion group content, and by providing custom CSS styles to change the formatting and appearance of the discussion group content itself. You can also change the width in pixels of the left sidebar and the main content area.
To set up email integration in FogBugz, you need to set up Mailboxes. Each FogBugz Mailbox corresponds to one incoming POP3 mailbox where FogBugz receives mail. You can set up as many mailboxes as you want, for example, you could set up customer-service@example.com as well as suggestions@example.com and bugs@example.com. Each mailbox can be treated differently.
To configure a mailbox, you need to set up two things: where the email comes from, and what FogBugz should do with it. The following options are configured when you set up a mailbox:
Email address - the full email address of the mailbox, for example, customerservice@example.com.
Full name - a full name that will appear when replying to email from this mailbox, for example, Company Customer Service. (Actually, when sending replies using FogBugz you will have a choice between this name and your own name, giving you the option to remain anonymous and use a company name like Customer Service, or use your own name.)
Account name - the log-in account on the POP3 mail server.
Password - the login password on the POP3 mail server. FogBugz will use the account name and this password to log in and retrieve the email, just as any other POP3 client such as Outlook Express would.
Mail Server - the DNS name or IP address of the POP3 mail server
Port - the TCP port for the POP3 service. This is almost always 110 unless you're using secure POP3, which is almost always 995.
Reply Automatically - allows you to decide if users should receive an immediate automatic reply when they send a request into this mailbox. FogBugz will not autoreply to follow-ups or to messages categorized as spam. For more details about configuring the outgoing reply message, click here.
Due - To insure that email is responded to promptly, FogBugz can set a due date for every mail message that comes in. More details.
Sort Messages - FogBugz can sort messages automatically, including spam removal. Learn more about FogBugz AutoSort and Blocking Spam.
Message Template - allows you to set up a signature that will be automatically inserted at the bottom of every reply you send in this mailbox. See Automatic Replies for a list of special variables that can be inserted here.
Delete spam after - To avoid spam filling up your FogBugz database, any message which is either resolved as SPAM or moved into the Spam area will be permanently and irrevocably deleted after (default) 7 days, or the number of days you set here. If you don't want to delete spam leave this blank.
Delete inquiries after - If you do not wish to keep a permanent record of incoming email, you can set up FogBugz to delete the complete case history of all closed inquiries after a certain number of days.
Deleting old spam and inquiries is handled nightly by the FogBugz Maintenance Service.
When you are looking at an email from a customer, at the top of the case you'll see a list of all the other emails you've ever received from the exact same email address in the Correspondent section:
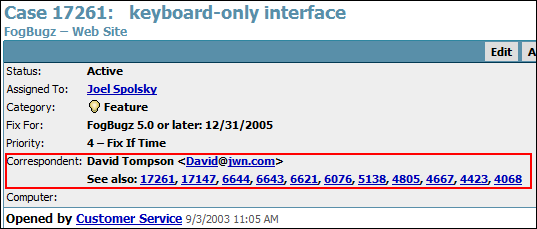
The See also section lists other cases sent to or from the same email address. Clicking on the link before the @ sign ("David" in this example) returns a full list of all email with this correspondent.
You can also search for other email from the same domain name by clicking on the link to the right of the @ sign in the email address ("jwn.com" in this fictitious example). This is helpful because sometimes multiple people will correspond with you from the same company and this link will find messages from all of these people.
You can also search for email from any email address or any fragment of an email address by customizing your filter:
- Choose Filters | Customize.
- Click the Reset button at the bottom to get a filter listing all open cases.
- Check "Closed Cases" for the Include field (at the top).
- Enter the full or partial email address to search for in the Correspondent field.
If you've never corresponded with the customer before, but you think the email address might be in an old case or a note from a colleague, then you can use full-text search of your FogBugz database.
- Click the Search box in the upper right-hand corner.
- Enter the email address, or the partial address with an asterisk, in the "Search for" box.
- Check the "Also search closed cases" box.
- Click Search.
You can configure FogBugz to reply automatically to incoming email in the mailbox screen. You can configure a subject line and message for the reply or use the default.
If you are sending an automatic reply, you can include the following special phrases in the message which will be replaced by FogBugz:
{case} for the case ID number
{sender} for the sender's email address
{subject} for the subject of the message
{ticket} for the external customer reference number to this case. This reference number includes a few random letters used as a password so that customers can't see other customers' email by trying different case numbers.
{ticketurl} for a link the customer can use to check the status of their case (e.g. http://fogbugz.example.com/default.asp?{ticket})
{fullname} for the full name associated with this mailbox
{email} for the email associated with this mailbox
{username} for the name of the user logged on to FogBugz
{useremail} for the email of the user logged on to FogBugz
No matter what you do, please make sure the outgoing subject includes (Case {case}), because that will insure that if the customer replies to the autoreply, their reply will go into the same case number instead of opening a new case.
FogBugz will not respond to follow-ups (messages that already have a case number in the subject) or to messages categorized as spam.
Also, to prevent mail loops, FogBugz will not automatically reply if any of the following is true:
- The From or Reply-to field contains postmaster, daemon, owner-, bounced, or auto
- The Subject field contains auto, thank, or vacation
- The Precedence field is junk, bulk, list
Also, FogBugz will not automatically reply to the same email address more than three times in one hour.
FogBugz lets you set up snippets. A snippet can be anything from a word or two ("Sincerely yours") to a complete form letter. When you are replying to an email, you simply type the name of the snippet followed by a backtick (`) key, and the snippet will be inserted for you automatically.
Snippets can be used to make it very easy to reply to frequently-asked questions with a canned reply or form letter that has been carefully edited.
There are two kinds of snippets: snippets for everybody, which are set up by an administrator for the whole team to use, and personal snippets, which only work for a single FogBugz user.
If you can't remember what snippet to use, press the snippet key twice (``) to browse a list of snippets.
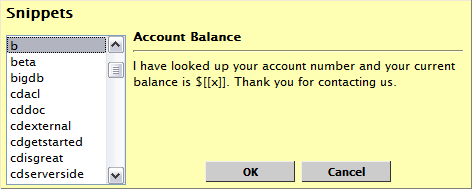
You can change the key that is used to activate snippets in the Options screen. By default FogBugz uses ` which is conveniently located in the top left corner of an American computer keyboard.
If a snippet contains a section surrounded by [[ and ]], that section will be highlighted after you insert the snippet on most web browsers. This is extremely useful when you want to insert something in the middle of a snippet. For example if the snippet b is defined as shown in the picture above, you can type b`24 to produce:
I have looked up your account number and your current balance is $24. Thank you for contacting us.
Snippets only work in the main editing area of a case.
To initiate email to a customer, click Send Email in the main toolbar.
This is useful because any replies from that customer will automatically be appended to the end of the same case and everyone else on your team can see the entire history of the email transaction.
If the email is related to an already existing case, click Email in the case itself. This associates an existing case with an outside correspondent.
For example, if a customer contacted you by phone, and you opened a bug based on their problem, but now you want to correspond with them via email, use the Email button inside the case to start an email correspondence which will be associated with that case.
When you've got a large team of people replying to customer email, there's a risk that two people will try to respond to the same message at the same time.
FogBugz prevents this in two ways:
- As soon as you hit the Reply button, the case is assigned to you. That way other people can see that you're working on it.
- If somebody else dashes in and sends a reply anyway, while you are in the process of composing your reply, when you click Send, FogBugz won't actually send the reply. It will warn you that somebody else has changed the case and let you decide whether you still want to send your reply or cancel it out:
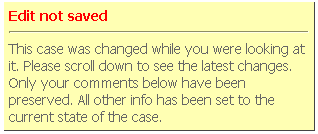
FogBugz contains a sophisticated spam-blocking algorithm that learns how to recognize spam automatically as you train it.
Rather than using a fixed set of spam clues, for example, assuming that "mortgage" must mean spam, it learns from your own incoming email. If you work for a bank, "mortgage" probably doesn't mean spam.
In addition to using only positive clues (for example, "V1agra" probably means spam), FogBugz will learn from negative clues as well (for example, if the email contains the name of one of your products it's much less likely to be spam.) FogBugz examines many aspects of the incoming email for clues which could be considered positive signs of spam, negative signs of spam, or neutral. And since you train it, it will adapt itself to the particular stream of email that you receive.
When you first install FogBugz and turn on FogBugz AutoSort, FogBugz sets up a project named Inbox with three areas: Spam, Not Spam, and Undecided. At first, FogBugz AutoSort has no clues at all about what messages are spam and what messages are not spam. All incoming messages are put straight into the Undecided area.
To train FogBugz AutoSort, you need to teach it about every message in the Undecided area, either by flagging it as spam by clicking the Spam button, or by moving it to the Not Spam area if it's not spam.
Any time you see a message in the wrong area, take the time to move it to the right area. This will help train FogBugz AutoSort.
After a few days, you should notice that FogBugz AutoSort is correctly sorting most messages. In the first few days there is a small chance that a few messages will be mistakenly flagged as spam. Don't worry about this, but do move them into the Not Spam area to help train FogBugz AutoSort.
After you've received a bunch of spam and a bunch of nonspam, typically after a couple of days or about 100-200 messages, you'll find that FogBugz AutoSort is doing a really good job automatically sorting messages. But no matter how good it gets, it will always be undecided about some messages and you'll have to decide those cases yourself.
FogBugz AutoSort tries to be conservative to avoid accidentally flagging a message as spam when it's not really spam. In practice, we have found that even with an email address that receives hundreds of spam messages a day, it is extremely rare for FogBugz AutoSort to accidentally mark something as spam that is a legitimate email. In fact, our experience is that it's more common for humans to mistake a real email for spam than for FogBugz AutoSort to make this mistake! Unfortunately, there's always the possibility that a legitimate email from a customer will look so spammy that it gets deleted accidentally. If you are concerned about this, set aside some time to review the spam messages every few days just to be certain nothing legitimate is getting lost. On the whole, though, you'll find that FogBugz AutoSort does a great job with very few "false positives."
FogBugz treats emails sorted as spam slightly differently than others in order to save you time. You will not receive notifications, auto-replies, or escalation reports regarding spam emails. Spam emails are also conveniently hidden from most views of your cases and summary reports, although it is still accessible with the click of a link.
Technical Note: FogBugz implements a modified version of the Bayesian filtering algorithm proposed by Paul Graham in the article A Plan for Spam and Better Bayesian Filtering, with modifications and improvements designed by Fog Creek technical staff.
FogBugz AutoSort automatically sorts incoming email into different areas. The simplest way to use FogBugz AutoSort is to separate spam from non-spam. But you can also set it up to divide incoming email into up to 14 areas. For example, you could divide incoming mail into four areas: Customer Service, Tech Support, Job Applications, and Spam. That way each incoming email can be routed to the right people quickly.
FogBugz AutoSort needs to be trained. When FogBugz AutoSort is not sure what to do, it will put incoming messages into the Undecided area, and you will have to manually move them to the correct area. For example, if a job application appears in the Undecided area, you simply move it to the Job Applications area and FogBugz AutoSort will learn a little more. Sometimes it will make a mistake, for example, putting something in the Job Application area that is really Spam. Once again, you'll move it, and FogBugz AutoSort will continue to learn from your corrections.
After a few dozen emails, FogBugz AutoSort will start doing a pretty good job. With a few days of training you should expect about 99% accuracy separating spam from non-spam. Even though FogBugz AutoSort becomes more and more accurate the more you train it, it can still make a few mistakes, but for the most part, it will do a good job of sorting out email into rough piles for you.
Setting Up the Email Sorter
To set up simple email sorting, separating Spam from Non-Spam:
1. Set up a Mailbox in FogBugz. Configure the mailbox to read email from your POP3 (email) server and turn on FogBugz Autosort in the Sort Messages option.
2. Incoming email will start appearing in a project called Inbox. This project has three areas: Spam, Not Spam, and Undecided.
3. On the Filters menu, choose Inbox to see all your incoming email sorted neatly.
4. At first, you'll need to move messages manually to train FogBugz AutoSort. After FogBugz has seen more than fifteen non-spam emails get sorted into their correct areas, it has enough data to start autosorting. When FogBugz AutoSort makes a mistake, or whenever a message arrives in the Undecided area, correct it simply by moving the message to the appropriate area or clicking Spam when the message is spam.
5. Over time FogBugz AutoSort will learn from your corrections. After a couple of weeks you can expect very high accuracy of email sorting.
To further sort messages by topic:
1. Add new areas to the Inbox project. You can also rename the Not Spam area to something more specific. The Spam and Undecided areas in Inbox are special and can't be modified.
2. Although you can set up as many as 14 custom areas in addition to Spam and Undecided, the fewer you create, the better a job FogBugz AutoSort will do.
3. Continue to train FogBugz AutoSort whenever it makes a mistake or when a message arrives in the Undecided area by changing the area manually.
If you are trying to sort messages into different areas, you will have the best luck if there are obvious clues in the message. For example, if you make an area for accounting, various words like "Invoice" and "Receipt" and "Payment" may be good clues that an incoming email goes to the accounting area, and FogBugz AutoSort will pick up on these clues automatically as you train it.
However, all artificial intelligence algorithms have their limitations, and there may be cases where FogBugz AutoSort simply can't figure out a good enough clue from the message as to which area it should go in. For example if you try to train FogBugz AutoSort to separate messages based on existing customers versus new customers, it might never be able to do this because there are no consistent clues in the message to do this sorting.
Although the learning process is automatic, it works best where there are specific consistent attributes of a message and message headers that FogBugz AutoSort can cue off of.
To insure that email is responded to promptly, FogBugz can set a due date for every mail message that comes in. This is configured within the mailbox.
When you set a due date, you can set it in absolute time, e.g. 4 hours. But realistically, unless you provide 24x7 customer service, you'll probably want to set due dates in working hours or days.
Example:
Your office hours are 9-5 Monday through Friday, and you strive to reply to customer email within 4 working hours.
If a message comes in at 4:00 pm on Friday, it will be due at 12:00 noon on Monday, because that is 4 working hours later.
Now, if Monday is a company holiday, the message will be due at 12:00 noon on Tuesday.
Any FogBugz administrator can set up your company working schedule on the Site configuration page using the Working Schedule settings. You can set up the days of the week when you work, the hours of each day when you work, and you can provide a list of holidays when you don't work at all.
Escalation Reports
Anyone can sign up to receive escalation reports via email, by checking the appropriate box on the Options screen. An escalation report is sent early every morning, and lists all cases which are either overdue or which will become due that day.
If you are using FogBugz AutoSort, escalation reports will not include cases that have been sorted as spam, because all due dates are removed from cases in this area.
To look a bit further into the future, you can set up a filter to list bugs that are going to be due sometime in the future and sort that filter by due date. For example, you might set up a filter listing all cases due in the next 2 weeks, in order by due date, and check that filter regularly.
Keep in mind that since FogBugz sends out automatic notification of a change to a case that is assigned to you, if you set up an "out of office" automatic reply in your own email client, you will create an infinite loop:
- For any new case assigned to you while you are out of the office, FogBugz will send you an email notifying you of that case.
- Your email client will reply to that email, saying you are out of the office. This reply will be appended to the case in FogBugz.
- Thus FogBugz will send you a notification that a case that is assigned to you has changed.
- Repeat steps 2 and 3 ad infinitum.
Solution:
Before you turn on the auto-reply feature in your email client, log in to FogBugz as an admin and turn off Email Notification for your FogBugz user account until your return.
SMTP Server
An outgoing mail server that supports SMTP used by FogBugz for all outgoing email.
Set this to the same thing as the 'outgoing mail server' in your own email program.
If you don't have another SMTP server, use the SMTP server included with Microsoft's IIS or your version of Unix; if that's on the same server as FogBugz specify localhost. If you don't want FogBugz to send email at all, enter the word NONE (all caps).
SMTP User
If your SMTP server requires login, provide the username here.
SMTP Password
If your SMTP server requires login, provide the password here.
Note: The username and password will be stored in clear text in the Windows registry so that FogBugz can use them to log on whenever needed. Also note that SMTP is a clear-text protocol so if the SMTP server is on a different computer, the username and password will be sent in clear text across the network. We recommend the following best practices for security:
-
Create a user account and password on your SMTP server that will only be used by FogBugz for sending email, so that if the account and password are revealed, they cannot be used for anything other than sending email.
-
Configure your SMTP server so that it does not relay email without logging in.
-
If possible, configure your SMTP server so that it only relays email from known IP addresses inside your network, including the FogBugz server itself. This will make it impossible for spammers to use your SMTP server to forward spam.
-
Either use an SMTP server which is located on your internal network, protected by a firewall, or create a secure VPN (Virtual Private Network) between your internal network and the SMTP server.
-
If you cannot secure the connection between your FogBugz server and the SMTP server, consider using
stunnel to create a secure, encrypted channel.
When FogBugz sends notification email, this is the email address it appears to come from. Generally you don't want users replying via email; they should be replying in FogBugz so a record is kept. Set this value to either a fake email address that bounces, or to the email address of a FogBugz Mailbox so replies are appended to the original case.
Log On Method
LDAP
FogBugz can use your LDAP server (or ActiveDirectory) to authenticate your users. Accounts will be created in FogBugz, but logging on will authenticate against the password in the LDAP server.
If you have existing accounts and you want to switch to LDAP, be sure that the name and email address in FogBugz match exactly with the name and email info on the LDAP server.
"Allow LDAP to create new accounts automatically" will allow any user with a valid LDAP account to log on to FogBugz. (At the moment they log on, a FogBugz account will be created for them.) If automatic LDAP account creation is not enabled, adding a new FogBugz user account requires going back to FogBugz authentication, turning off LDAP authentication, adding the new account (making sure that the name and email address match the LDAP server), and then turning LDAP authentication back on.
FogBugz
FogBugz also offers three log on methods with increasing levels of security.
Names in dropdown, no passwords
Provides no security. Anyone can log on to any account. This can be used in small organizations where you trust everyone, and are behind a firewall so there is no risk of public access to the FogBugz server.
Names in dropdown, with passwords
Very low security. Every user can have a password, but the list of users is shown in a dropdown box in the log on screen. This will allow anyone who can access the FogBugz server to determine a list of names of users. If some of those users had blank or easily-guessed passwords, a malicious user could break into FogBugz.
Type email address and password
Medium security. Every user has a password and must type their email address and password to log on.
Log on
Determines whether the "Remember me at this computer" option appears on the log on page.
"Remember Me" Allowed
Users, when logging on, can check the "Remember me at this computer" box which creates a cookie so that they are already logged on when they come back using the same browser
"Remember Me" Not Allowed
The "Remember me at this computer" checkbox will not appear, and users will be logged off when they close the browser or after a long idle period.
New User Control
Normally only administrators can create FogBugz accounts. By changing this setting to "Anybody can create an account" you will allow anyone who can access FogBugz to make their own account. This is useful if your FogBugz server is secure inside a firewall and you have a large number of potential users in your organization.
Fog Creek recommends the following best practices for security:
-
Always use the "Type email address and password" setting.
-
If your users are likely to be using public Internet terminals, use the "'Remember Me' Not Allowed" setting.
-
If your FogBugz installation is on the public Internet, ensure that New User Control is set to "Only admins can create accounts."
-
If your FogBugz installation is on the public Internet, follow your OS vendor's best practices for locking down the server, and always apply the latest patches.
-
Configure the web server running FogBugz so it only allows access from a restricted set of IP addresses which you trust.
-
Configure the web server running FogBugz to use SSL.
-
Configure the web server running FogBugz to require a second level of authentication (browser-based authentication), in addition to the authentication that FogBugz itself provides.
The Database setting determines which database FogBugz will connect to.
For an Access (Jet) database, select the Access tab and enter the full path to an Access (.MDB) database file.
For a SQL Server database, simply enter the name of the SQL Server and the name of the FogBugz database on that server.
For any other type of database, enter an ODBC connection string. The useful web site http://www.connectionstrings.com/ contains detailed information on how to construct an ODBC connection string for any database.
FogBugz has two fields, Version and Computer, used to keep track of the version of your software where a particular bug was found, and the computer or computer configuration on which it was found. These fields will not necessarily make sense for every development team, so the fields can be turned off to reduce clutter, or re-named as something else if there is something else which you need to track. You can then include these fields (whatever name you give them) in your filters.
This should contain the URL of your FogBugz installation. It is used to coordinate between the FogBugz Maintenence Service and your FogBugz installation.
Configures your company working schedule. Note that there is also a link to this page in the Administration section on the FogBugz home page (click the FogBugz logo top left to get to the home page).
The hours per day for estimates is used when converting between hours and days in the estimates field.
The other fields are used to set a due date on incoming email automatically.
Example:
Your office hours are 9-5 Monday through Friday, and you strive to reply to customer email within 4 working hours.
If a message comes in at 4:00 pm on Friday, it will be due at 12:00 noon on Monday, because that is 4 working hours later.
Now, if Monday is a company holiday, the message will be due at 12:00 noon on Tuesday.
See Source Control Integration.
Determines what language to use. Users may override this setting for themselves at any time. This is the language used if the user has not selected a language or their browser language is not available.
Update categories and statuses
When you change the site language, you may wish to update categories (Bug, Feature, Inquiry) and statuses (Active, Resolved etc.) to the default language. You can do this by checking the "Update categories and statuses" box.
Determines how dates should be formatted. Choose Use FogBugz Default to get this information from your server's "language" setting, or override by choosing a language here. Also, users may override this setting for themselves at any time.
Determines the maximum size for each uploaded file attached to a case.
Allows FogBugz to connect to Fog Creek Software servers once a week to check if there is a new version of FogBugz available, and to warn you if your support contract is about to run out. Only your order number will be transmitted to Fog Creek Software.
Removes all the learning that FogBugz AutoSort has done. After you do this, FogBugz AutoSort will forget everything it knows about what consititutes spam and how to sort incoming inquiries into areas, and you will have to train it again.
There are two main steps to setting up integration between FogBugz and your source control system.
1.) Getting Source Control to Transmit Changes to FogBugz
You need to install a "trigger" script in your source control system to notify FogBugz whenever a check-in occurs that is related to a particular bug. (For the .vbs and .wsf files we provide below, you will need Windows Scripting 5.6 or later.)
** If you are a trial user, you can download the trial versions of these scripts by logging into FogBugz and clicking "Demo Source Control Integration" on the main menu. If you decide to buy FogBugz, you can convert your trial script to work with your own installation with just a few modifications.
Subversion, CVS, and Perforce scripts
The way these scripts work is they send the check-in information via HTTP to a FogBugz ASP page named cvsSubmit.asp, using a URL like this:
http://your.fogbugz.server/cvsSubmit.asp?ixBug=bugID&sFile=file&sPrev=x&sNew=y
-
bugID is the FogBugz bug number
-
file is the source file that is being checked in
-
x is the previous revision number
-
y is the new revision number
Note: If you serve up FogBugz over SSL, and you get a prompt about your SSL certificate when you access FogBugz from a computer that is not the web server, you need to turn off SSL for cvsSubmit.asp, because that prompt will prevent this integration from working.
Although you can create your trigger script in any language, we provide the following sample scripts in Perl and VBScript:
Alternately, if you prefer, you could write a script that notifies FogBugz by using a data access library such as ODBC or OLEDB to insert a new record directly in the table named CVS containing the above four values.
Visual Source Safe scripts
If you use Visual Source Safe, you need to run a script that reads the journal file written by VSS when checkins are made. The script we provide then connects to FogBugz and adds the check-in info. You can set up this script as a scheduled task. Be sure to set the journal file for all the appropriate projects in the VSS Admin Console (Tools->Options->General tab).
Vault integration
If you are using Vault, please read this document instead. We currently do not provide Vault integration for trial users.
2.) Getting FogBugz to Provide Hyperlinks to Your Source Control Viewer
Now let's configure FogBugz to create hyperlinks from the check-in information to a web page that shows either the logs or the diffs.
You will need a tool with which to view your file diffs and logs from a web browser. This tool will be different depending on which source control system you use. Following are the viewing tools we suggest:
Subversion: WebSVN (Make sure that WebSVN uses the same user to create and write to the temp file. On some Windows systems, WebSVN has the iuser user create the file and the IWAM user updating it.)
CVS: CVSweb (If you run CVSNT on Windows, you can use CVSWEB NT)
Perforce: P4Web
VSS: FogBugz itself will display the diffs and logs (Trial users: FogBugz cannot use its normal method of displaying the diffs and logs for trial users, so we suggest using VSS Remoting).
Once you have your web viewing tool set up, log into FogBugz as an admin, click on Site (top right), and set the two Source Control URLs to point to your web viewing tool, following the examples on that page.
Let’s say I’m working on a bug … bug number 3712:
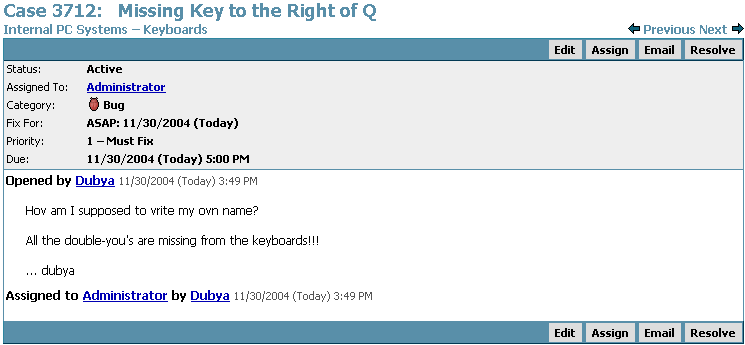
I've fixed the bug, and now I'm ready to check in the fixes.
As usual CVS prompts me for a log comment:
![[Image]](../Articles/SourceControl/HelpPics/dubyaBug3.gif)
I'll add the comment, but I'll also add the bug number that I was fixing, by creating a line of the form BugzID: 3712 (not case-sensitive), as shown here:
![[Image]](../Articles/SourceControl/HelpPics/dubyaBug4.gif)
When I save and exit, CVS commits my changes, and notifies FogBugz:
![[Image]](../Articles/SourceControl/HelpPics/dubyaBug5.gif)
We've got CVS set up to send notification emails to the whole development team with a list of checkins. Here's the message:
![[Image]](../Articles/SourceControl/HelpPics/dubyaBug9.gif)
Notice there's a URL in there linking to the bug itself. And if we go back and look at the bug, we'll see a Checkins line:
![[Image]](../Articles/SourceControl/HelpPics/dubyaBug6.png)
This line contains two links. The first link, with the file name where the change occurred, links to the CVS log:
![[Image]](../Articles/SourceControl/HelpPics/dubyaBug7.gif)
Notice that the bug ID number is stored in the CVS log.
The second link shows the revision number of this file (1.4), and links to the exact diff that I just checked in:
![[Image]](../Articles/SourceControl/HelpPics/dubyaBug8.gif)
Besides making it easy to keep check-ins matched up with bug reports, I can now assign the fix to another developer and ask them to check my fix. They will be able to click one link to see the exact change I made which makes it easy for them to review it.
Let’s say I’m working on a bug … bug number 3712:
I've fixed the bug, and now I'm ready to check in the fixes. As usual Perforce prompts me for a log comment:
![[Image]](../Articles/SourceControl/HelpPics/dubyaBug11.gif)
I'll add the comment, but I'll also add the bug number that I was fixing, by inserting a line of the form BugzID: 3712 in the comment, as shown here:
![[Image]](../Articles/SourceControl/HelpPics/dubyaBug12.gif)
Perforce commits my changes, and notifies FogBugz.
Now when we go back and look at the bug, we'll see a Checkins line:
![[Image]](../Articles/SourceControl/HelpPics/dubyaBug10.png)
This line contains two links. The first link, with the file name where the change occurred, links to the Perforce log:
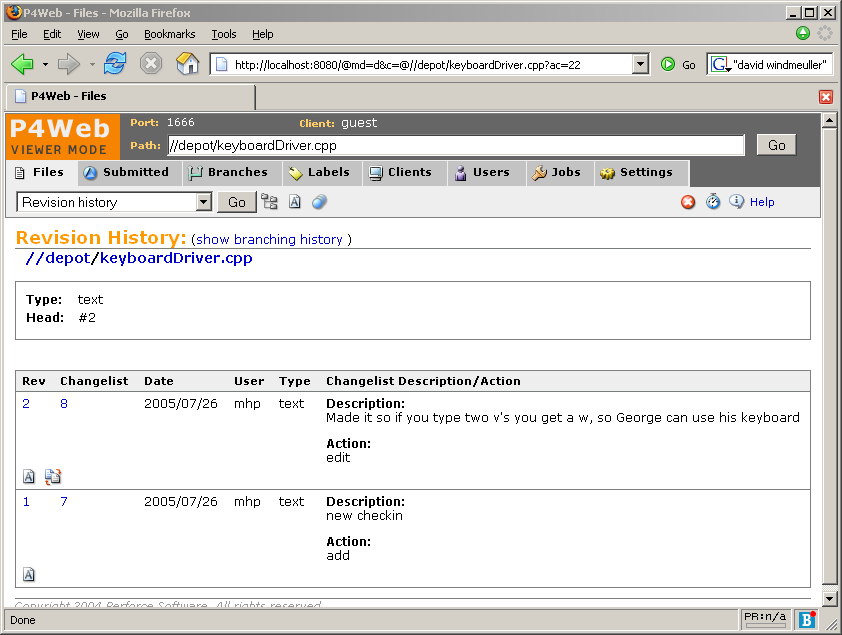
The second link shows the revision number of this file (1), and links to the exact diff that I just checked in:
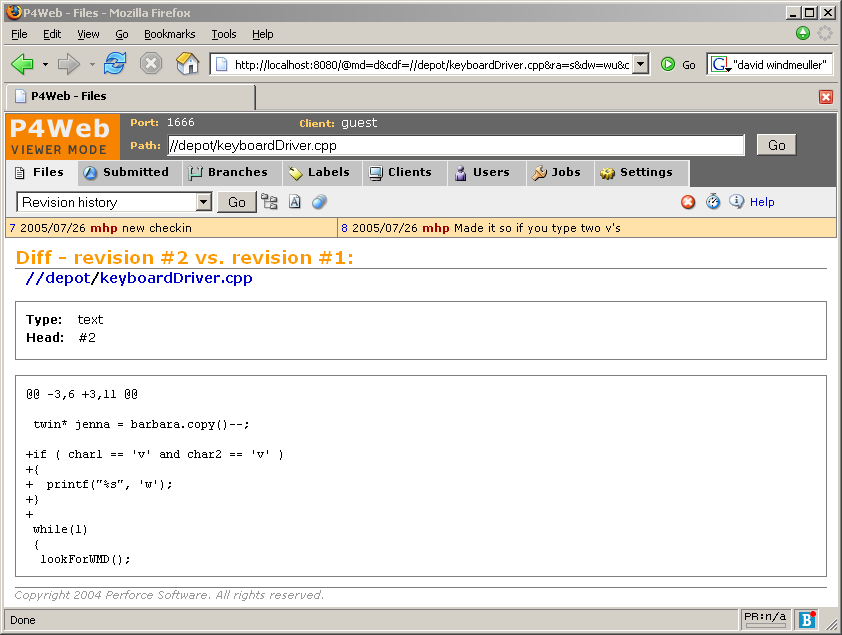
Besides making it easy to keep checkins matched up with bug reports, I can now assign the fix to another developer and ask them to check my fix. They will be able to click one link to see the exact change I made which makes it easy for them to review it.
Let’s say I’m working on a bug … bug number 3712:
I've fixed the bug, and now I'm ready to check in the fixes. As usual VSS prompts me for a log comment:
![[Image]](../Articles/SourceControl/HelpPics/VSSblankcheckin.gif)
I'll add the comment, but I'll also add the bug number that I was fixing, by inserting a line of the form BugzID: 3712 in the comment, as shown here:

VSScommits my changes, and logs them to a journal.txt file. Later a Windows script is run and notifies FogBugz of the submission.
Now when we go back and look at the bug, we'll see a Checkins line:
This line contains two links. The first link, with the file name where the change occurred, links to the VSS log:

The second link shows the revision number of this file (3), and links to the exact diff that I just checked in:
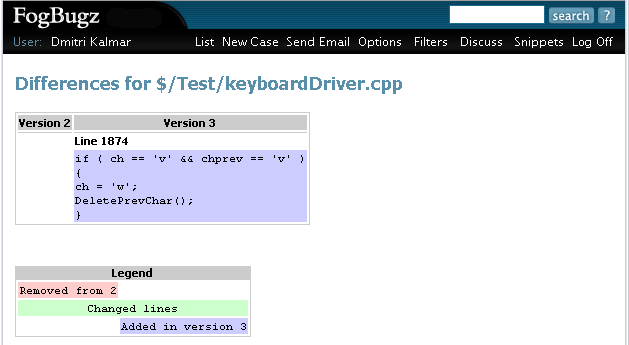
Besides making it easy to keep checkins matched up with bug reports, I can now assign the fix to another developer and ask them to check my fix. They will be able to click one link to see the exact change I made which makes it easy for them to review it.
The following instructions show how to set up a trigger script in CVS which will notify FogBugz whenever a check-in occurs that is related to a particular bug.
Before proceeding, please locate the following files which you will use in a moment. If you are a trial user, you can download the trial versions of these scripts by logging into FogBugz and clicking "Demo Source Control Integration" on the main menu.
You can use either Perl:
FogBugz\accessories\SourceControl\CVS\logBugData.pl
Or VBScript:
FogBugz\accessories\SourceControl\CVS\logBugData.vbs
This article describes using the Perl script, but using the VBScript script works the same way. If you use the Perl script you will need perl on the CVS Server. Linux normally comes with perl; there are also freely available versions of perl for Windows.
1. Check out the CVSROOT directory.
![[Image]](../Articles/SourceControl/HelpPics/cvs1.gif)
2. Create a file named bugz.txt. Type "BUGZID:", then hit enter, then hit enter again. You can see, highlighted below, that the cursor is two lines below the text. You want those carriage returns.
![[Image]](../Articles/SourceControl/HelpPics/cvs-bugz-txt.png)
3. Add this to the repository.
![[Image]](../Articles/SourceControl/HelpPics/cvs3.gif)
4. Copy in logBugData.pl that you located earlier, and add it to the repository. Alternately you can use the .vbs version of the file if you don't want to use Perl.
![[Image]](../Articles/SourceControl/HelpPics/cvs-copy-log-data.png)
5. (This step is not required for trial users.) Edit the settings at the top of logBugData.pl shown below (they look basically the same in the .vbs version):

The settings are as follows:
-
Set $BUGZ_SERVER to the DNS name of the web server running FogBugz. Let's say your FogBugz URL is:
http://www.example.com/FogBugz/
Then you would set $BUGZ_SERVER to:
"www.example.com"
-
Set $BUGZ_URL to the virtual path to your FogBugz installation. In the example above, it would be:
"/FogBugz/"
This is whatever name you chose when you ran FogBugz setup. Make sure to include the slash on either side.
If FogBugz is running at the root of the website instead of a virtual directory just set it to a forward slash:
"/"
-
If you are using the PHP version of FogBugz, change "cvsSubmit.asp" to "cvsSubmit.php".
6. Edit the file rcsinfo, adding one line at the end as shown below. Change the file path shown here so that it points to the bugz.txt file in your CVS repository on your CVS server (that you created in Step 2 but haven't checked in yet).
On Unix: ALL $CVSROOT/path-to-repository/bugz.txt
On Windows: ALL $CVSROOT\path-to-repository\bugz.txt
![[Image]](../Articles/SourceControl/HelpPics/cvs6.gif)
7. Edit the file loginfo, adding one line at the end as shown below. Again, change the file path shown here to point to the logBugData.pl file in your CVS repository on your CVS server.
Using Perl on Unix: ALL perl -s /path/to/cvs/logBugData.pl "%{sVv}"
Using Perl on Windows:  ALL perl -s C:\\path\\to\\cvs\\logBugData.pl "%{sVv}"
Using VBScript on Windows:  ALL cscript.exe C:\\path\\to\\cvs\\logBugData.vbs "%{sVv}"
![[Image]](../Articles/SourceControl/HelpPics/cvs7_2.gif)
8. Edit the file checkoutlist, adding two lines at the end as shown in these examples:
Using Perl:

bugz.txt Error-bugz.txt
logBugData.pl Error-logBugData.pl


Using VBScript:

bugz.txt Error-bugz.txt
logBugData.vbs Error-logBugData.vbs
![[Image]](../Articles/SourceControl/HelpPics/cvs8.gif)
9. Check in your changes.
![[Image]](../Articles/SourceControl/HelpPics/cvs9.gif)
Each user will have to re-check out the source tree they are working on so that the "CVS: BUGZID:" line is added to the template for log notes. (Otherwise everything will still work, but they will have to remember to add BUGZID: manually each time they commit a change.)
10. If your CVS repository is on Unix make sure to set execute permissions on the logBugData.pl file.
11. Here's a screenshot of a check-in that successfully connected to FogBugz (this screenshot is of CVSNT on Windows, utilizing logBugData.vbs, that's why you see "Windows Script Host" poking its face in):
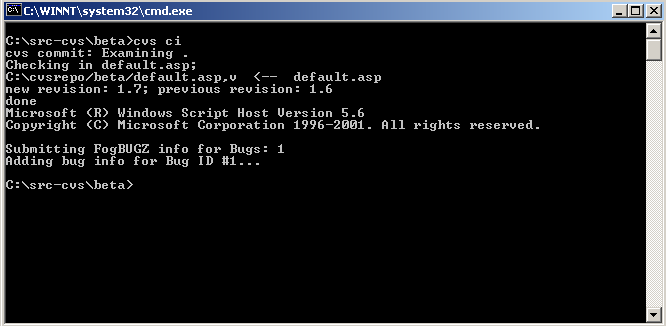
Notice that it says "Adding bug info for Bug ID #1"! This means that when I view bug number 1 in FogBugz I see this now:
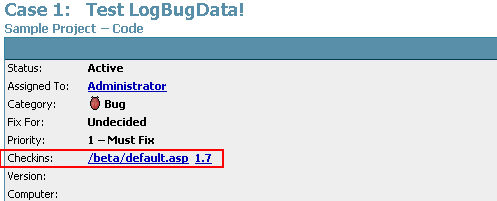
NOTE: If this is NOT your joyous experience right now, years of technical support have shown us that it's 99.9% percent likely that you diverged ever, ever, ever so slightly from the steps above. Maybe you put .pl instead of .vbs somewhere. Maybe you put a / instead of a \ somewhere. Maybe the path that you thought lead to your bugz.txt file does not actually lead to that file. Please go over all the above steps pretending you are CVS trying to execute everything step by step. We find that lots of patience usually does the trick, especially when followed by lots of cookies afterwards.
The following instructions show how to set up a trigger script in Subversion which will notify FogBugz whenever a check-in occurs that is related to a particular bug.
Before proceeding, please locate the following files which you will use in a moment. If you are a trial user, you can download the trial versions of these scripts by logging into FogBugz and clicking "Demo Source Control Integration" on the main menu. After downloading, trial users can skip directly to step 2 on this page.
You can use either Perl:
FogBugz\Accessories\SourceControl\Subversion\logBugDataSVN.pl
Or VBScript:
FogBugz\Accessories\SourceControl\Subversion\logBugDataSVN.vbs
Additionally please locate the SubVersion-to-FogBugz post-commit hook file:
FogBugz\Accessories\SourceControl\Subversion\post-commit.bat
-
Make the following changes at the top of the logBugDataSVN file to suit your environment:
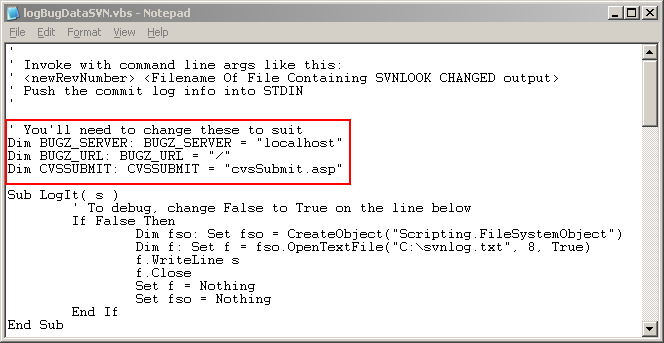
-
Set the value of BUGZ_SERVER to the DNS name of the web server running FogBugz, for example " www.example.com".
-
Set the value of BUGZ_URL to the virtual path to your FogBugz installation. For many sites this is "/FogBugz/". Just take the full URL of your FogBugz installation - "http://www.example.com/bugz/" and remove the "http://www.example.com" part. (If FogBugz is running at the root, use "/").
-
If you are using the PHP version of FogBugz, change CVSSUBMIT from "cvsSubmit.asp" to "cvsSubmit.php".
-
If your SVN repository is on Unix, make sure to set execute permissions on your logBugDataSVN file.
- Put both post-commit.bat (or post-commit for Unix/Mac users) and your logBugDataSVN file into the Hooks directory in your Subversion repository. If your SVN repository is on Unix, make sure to set execute permissions on your post-commit file.
The following instructions show how to set up a trigger script in Perforce which will notify FogBugz whenever a check-in occurs that is related to a particular bug.
We provide sample scripts in both Perl and VBScript. This article describes using Perl. If your Perforce server is on Windows and you would rather use VBScript, see the alternate instructions here.
If you are a trial user, you can download the trial versions of these scripts by logging into FogBugz and clicking "Demo Source Control Integration" on the main menu.
1. Find the logBugDataP4.pl script which is located in your FogBugz\Accessories\SourceControl\Perforce folder, and then place it in the directory that contains your Perforce server executable (e.g. C:\Program Files\Perforce\).
2. Edit the file as follows (Trial users: You only need to edit the P4USERNAME and P4PASSWORD variables. The rest of this step is set up automatically for your trial server.):
-
Bring up FogBugz in a browser and look at the url you use to access FogBugz.
-
BUGZ_SERVER: Set this to the DNS name of the web server running FogBugz, for example,
www.example.com.
-
BUGZ_PORT: Only change this if FogBugz is not running on the default port 80.
-
BUGZ_URL: Set this to the virtual path to your FogBugz installation. For many sites this is "/FogBugz/". Just take the full URL of your FogBugz installation - "http://www.example.com/bugz/" and remove the "http://www.example.com" part. If FogBugz is running at the root, use "/".
-
P4USERNAME: Perforce passwords cannot be accessed from trigger scripts, so the good folks at Perforce will give you a free "background" or "automation" user for this purpose, please contact them at support@perforce.com to pursue this option. Enter the name of that user here.
-
P4PASSWORD: Enter the password of the automation user here. If you do NOT have Perforce passwords enabled, just leave this blank.
![[Image]](../Articles/SourceControl/HelpPics/p4-perl.png)
3. Perforce will let you call an executable every time files are submitted (actually, just before the submission occurs). This is called a trigger. We want to use a trigger to call the logBugDataP4.pl file every time any files are submitted in Perforce. Type p4 triggers on the command line (DOS window). A text file appears in Notepad. (If it doesn't, make sure the full path to p4.exe is in your Path environment variable.) To add the FogBugz trigger you need to add a line to at the bottom of this file.
The trigger looks slightly different depending on what version of Perforce you use:
Perforce Version 2003.2 - all triggers are of type "submit", no need to specify type:
FogBugzTrigger //... "C:\path\to\your\perl.exe C:\path\to\your\logBugDataP4.pl %changelist% %serverport% %client%"
Perforce Version 2004.2 - you must specify the type of trigger as "submit":
FogBugzTrigger submit //... "C:\path\to\your\perl.exe C:\path\to\your\logBugDataP4.pl %changelist% %serverport% %client%"
Note that this new line has a tab at the beginning. Adjust the path to the perl interpreter, and the path to the logBugDataP4.pl file to make sure it points to logBugDataP4.pl on your server (wherever you put it).
Save this temp file and close Notepad. The trigger is now added. To see how to use this integration, click here for our screenshot tutorial.
If you don't see the checkin entries in the FogBugz case, here is some troubleshooting help:
The following instructions show how to set up a trigger script in Perforce which will notify FogBugz whenever a check-in occurs that is related to a particular bug.
We provide sample scripts in both Perl and VBScript. This article describes using VBScript. If you would rather use Perl, see the alternate instructions here.
If you are a trial user, you can download the trial versions of these scripts by logging into FogBugz and clicking "Demo Source Control Integration" on the main menu.
1. Find the logBugDataP4.vbs script which is located in your FogBugz\Accessories\SourceControl\Perforce folder, and then place it in the directory that contains your Perforce server executable (e.g. C:\Program Files\Perforce\).
2. Edit the file as follows (Trial users: You only need to edit the P4USERNAME and P4PASSWORD variables. The rest of this step is set up automatically for your trial server.):
-
Bring up FogBugz in a browser and look at the url you use to access FogBugz.
-
BUGZ_SERVER: Set this to the DNS name of the web server running FogBugz, for example, www.example.com.
-
BUGZ_URL: Set this to the virtual path to your FogBugz installation. For many sites this is "/FogBugz/". Just take the full URL of your FogBugz installation - "http://www.example.com/bugz/" and remove the "http://www.example.com" part. If FogBugz is running at the root, use "/".
-
P4USERNAME: Perforce passwords cannot be accessed from trigger scripts, so the good folks at Perforce will give you a free "background" or "automation" user for this purpose, please contact them at support@perforce.com to pursue this option. Enter the name of that user here.
-
P4PASSWORD: Enter the password of the automation user here. If you do NOT have Perforce passwords enabled, leave this blank.
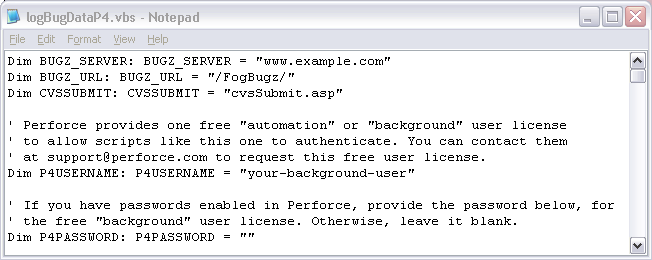
3. Perforce will let you call an executable every time files are submitted (actually, just before the submission occurs). This is called a trigger. We want to use a trigger to call the logBugDataP4.vbs file every time any files are submitted in Perforce. Type p4 triggers on the command line (DOS window). A text file appears in Notepad. (If it doesn't, make sure the full path to p4.exe is in your Path environment variable.) To add the FogBugz trigger you need to add a line to at the bottom of this file.
The trigger looks slightly different depending on what version of Perforce you use:
Perforce Version 2003.2 - all triggers are of type "submit", no need to specify type:
FogBugzTrigger //... "cscript.exe C:\logBugDataP4.vbs %changelist% %serverport% %client%"
Perforce Version 2004.2 - you must specify the type of trigger as "submit":
FogBugzTrigger submit //... "cscript.exe C:\logBugDataP4.vbs %changelist% %serverport% %client%"
Note that this new line has a tab at the beginning. Also, adjust the file path to the logBugDataP4.vbs file to make sure it points to logBugDataP4.vbs on your server (wherever you put it).
Save this temp file and close Notepad. The trigger is now added. To see how to use this integration, click here for our screenshot tutorial.
If you don't see the checkin entries in the FogBugz case, here is some troubleshooting help:
Before you begin, you need to know the path to your VSS database directory, for example it may be:
C:\Program Files\Microsoft Visual Studio\Common\VSS
The VSS database directory contains a file named SrcSafe.ini, that's how you can identify it. You can read more at Microsoft's website.
You will also need to locate the vss_fbupdate.wsf file in the FogBugz\Accessories\SourceControl\VSS folder. If you are a trial user, you can download the trial versions of this script by logging into FogBugz and clicking "Demo Source Control Integration" on the main menu.
1. Edit the vss_fbupdate.wsf file as follows (Trial users: You only need to edit the FB_VSS_USER and FB_VSS_PASSWORD variables. The rest of this step is set up automatically for your trial server.):
2. Uncomment and edit the following line in vss_fbupdate.wsf:
- For each VSS project you have, add a line to the script beneath the commented out line
'Call ProcessVSSJournal("Project Name", "Path to VSS Database directory")
For example:
Call ProcessVSSJournal("Test", "C:\Program Files\Microsoft Visual Studio\Common\VSS")
Note: If you are using MySQL, you cannot have an underscore in the file path, since it will be replaced by MySQL with a dash, and you cannot use a backslash \ since MySQL will interpret that as an escape character, so use forward slashes instead /
3. For each VSS Database you have, run the Admin Console and choose Tools->Options. Make sure it is set to create a file called journal.txt in the VSS Database directory.
Using the example above, the "Log all actions in journal file" would point to "C:\program files\microsoft visual studio\common\vss\journal.txt". If VSS says no such path exists, try using a UNC path (you will then have to use this in vss_fbupdate.wsf as well).
![[Image]](../Articles/SourceControl/HelpPics/vss.gif)
4. Set the vss_fbupdate.wsf file to run as a scheduled task every so often (maybe hourly or even more often if you like). The task will complete very quickly so do not worry about this script running too often. Make sure this task runs as a user that has priveleges to rename/delete files in the VSS directories (usually NOT the FogBugz user, but instead an admin on the machine). Use the //B option to wscript so the script does NOT run in interactive mode:
c:\winnt\system32\wscript.exe //B d:\progra~1\fogbugz\accessories\SourceControl\vss\vss_fbupdate.wsf
Since this is run on the command line, you can't have a space in Program Files, hence the abbreviation.
5. You must make sure that the FogBugz user or whomever you installed FogBugz to run as has READ access on all your VSS folders and all subfolders. The user must also have FULL CONTROL on the names.dat and the rights.dat files, and the LoggedIn directory. Also it must have FULL CONTROL ON THE SSUS.DLL and SSAPI.DLL in order to create the SourceSafe COM object.
6. We suggest setting up VSS to run on the same machine as FogBugz so that you can use our internal tools to view diffs and logs. If this is not feasible for you, you can install a separate instance of FogBugz on IIS on the VSS machine, whose sole purpose is to read VSS files and show you the diffs and logs. Be sure the FogBugz user in that IIS has permissions on the VSS files on that server as specified above. Trial users (and those who do not wish to install FogBugz on the same machine that runs VSS) can use VSS Remoting to display diffs and logs. Finally, log into FogBugz on your main web server, go to the Site page and follow the examples provided for source control urls.
We currently do not provide Vault integration for trial users.
FogBugz Configuration
To enable History: After installing FogBugz, log on as the administrator. Go to the Site Configuration page. In the text box "SourceControl URL for logs", type the case-sensitive URL in the following format:
http://<vaultserver>/VaultService/VaultWeb/VaultHistory.aspx?File=^FILE
To enable Diff: In the text box "Source Control URL for diffs", enter the case-sensitive URL for the Vault history page, using the following format:
http://<vaultserver>/VaultService/VaultWeb/VaultDiff.aspx?File=^FILE&Object=^R1&Version=^R2
To enable bug tracking, you must have Vault admin privileges and access to the Vault Admin Tool.
If you use repositories in Vault, then you need to further specify your repository in the url:
http://<vaultserver>/VaultService/VaultWeb/VaultHistory.aspx?File=^FILE&Repository=RepositoryName
http://<vaultserver>/VaultService/VaultWeb/VaultHistory.aspx?File=^FILE&Object=^R1&Version=^R2&Repository=RepositoryName
Vault Configuration
Log on to the Vault Admin Tool and go to the Repository Options tab. In the Bug Tracking Integration URL box, type in the location of the FogBugz server, something like:
http://<FogBugzserver>/FogBugz
The integration is automatically enabled when the URL is entered and disabled when it is empty. The default is empty.
Updating a Case
The Vault Check In/Commit dialog allows you to associate a Vault file with a FogBugz case during the check in process. Type the case number in the Update Bugs box. When the commit has been completed, the Vault file name and path will appear in the FogBugz case detail page.
Viewing a Case
In FogBugz, go to the detail page of a selected case.
A list of all the files that have been associated with the case through Vault’s check in process will appear next to the Checkins label. This list includes the Vault Repository ID, the path to the associated file, and the version of the file.
Click on the file name to view the Vault History page. Click on the version number to see the Vault Diff page (what changed with that check-in).
Vault History
The Vault History page gives you a detail history of the selected file on the case detail page. The page shows the following information for each check in operation completed:
The user who committed the change
The version of the file created
The action that was performed
Any comment the user may have entered as part of the commit
On the first attempt to see the history page during a FogBugz session, you will be asked for a username and password. Upon success of the login, you will be presented with the Vault History page.
Vault Diff
The Vault Diff page shows you the diff between the selected file and the previous version.
Click the link showing the version number of the file. The diff window will appear and display a side by side comparison of the two versions of the file. Line numbers are displayed for each line of the file, modified lines are colored red, added lines green, and deleted lines blue.
FogBugz makes it easy to do spot code reviews if you have set up source code integration. When you check in a code change and associate it with a case, you can simply assign that case to another developer requesting that they code-review it. Since FogBugz creates hyperlinks to the diffs that were checked in, that developer can simply click on the links to do a quick code review.
Fog Creek Software has been using Subversion as our source control system for a few years now. We switched a while back from using CVS and have nothing but praise for Subversion. Anyone currently using CVS should bite the bullet and make the switch. It just works. The price is right, and best of all it integrates tightly with FogBugz. We support a whole host of Source Control Systems, and adding new ones is very simple, but if you are starting out -- our recommendation is to start with Subversion.
Once you get Subversion set up and running, if you are on Windows, you will be amazed at how useful a good Subversion client can be. Steve King has created a fantastic piece of software, the TortoiseSVN client, and he has spent some time making sure that it works perfectly with FogBugz. It uses a set of properties on the Subversion repository which tell it how to treat commit messages to pull out bug information.
Rather than trying to explain the cryptic setup, I'll just give you the commands for getting this running ASAP from the command line. If you have problems with the command lines, right click on the folder, switch to the Subversion tab and set the properties via the Windows interface.
- Check out your repository
- cd to the root directory of your checkout
- Run the following commands from the command line.
You have to run them from the command line because a batch file will replace %BUGID% with nothing (substituting nothing for what it thinks is the variable BUGID). Note the . at the end of these commands is not a period, but should be entered as a space . after the double quotes, indicating the current directory.
svn propset -R bugtraq:label "BugzID:" .
svn propset -R bugtraq:url "http://your.fogbugz.url/default.asp?%BUGID%" .
svn propset -R bugtraq:message "BugzID: %BUGID%" .
svn propset -R bugtraq:number "true" .
svn propset -R bugtraq:warnifnoissue "false" .
svn commit -q -m "Added BugzID properties to the repository"
- Verify when you are finished that the bugtraq:message is BugzID: %BUGID% and not just BugzID:
- If you are smarter than me, than check out this guide which explains all the above mumbo jumbo.
You will need to continue with the Subversion Source Control integration steps listed here (install WebSVN and make sure bugtraq is turned on in the config.inc file once it is installed).
Now when you go to check in a file using Tortoise, it will give you a window where you can enter the bug number:
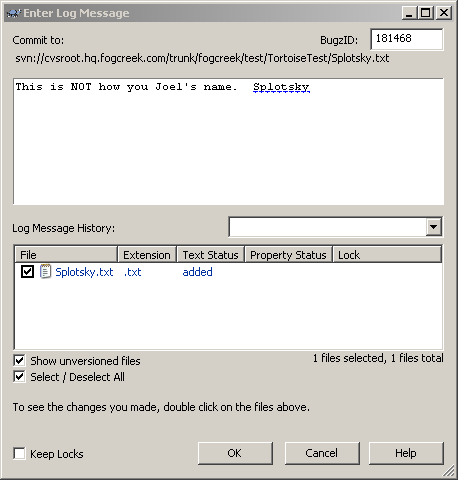
On the command line you could just enter the log message as
BugzID:181468
This is NOT how you spell Joel's name. Splotsky.
(I'll open another bug on the fact that I left the word 'spell' out of the screenshot')
But it's nice to have the GUI client show the bug number in its own window.
And in FogBugz, you can view the checkin. Click on the filename to see the contents of the file. Click on the revision name to see the diffs for that file to the previous revision.
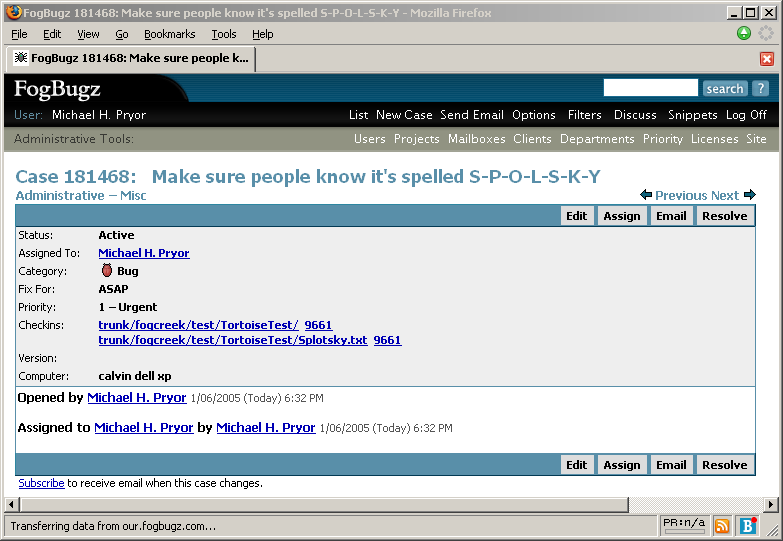
And the reverse direction link from WebSVN back to FogBugz - the bug number is now a link to the case in FogBugz.
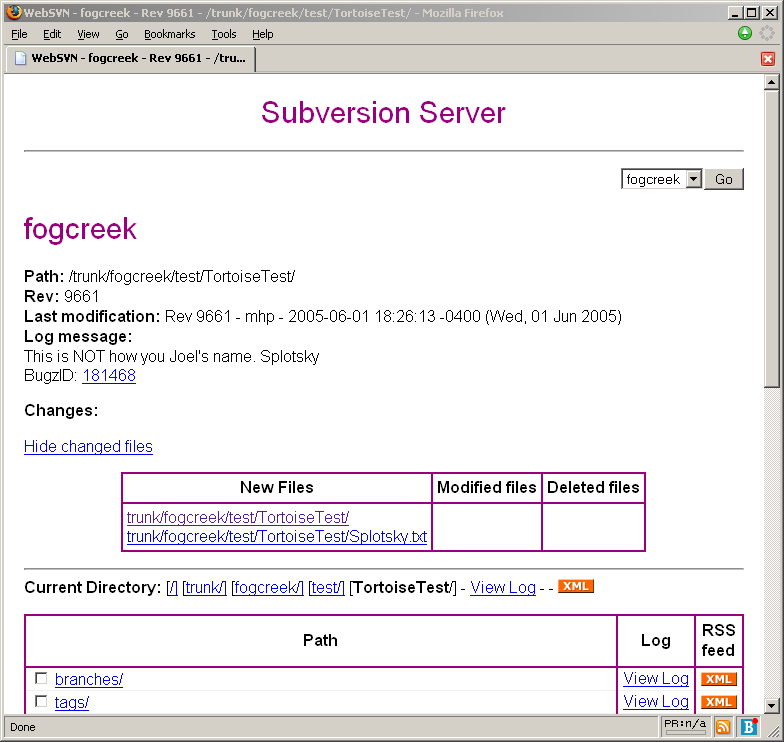
And even cooler, when you view the log history in TortoiseSVN, the bug number is a link too:
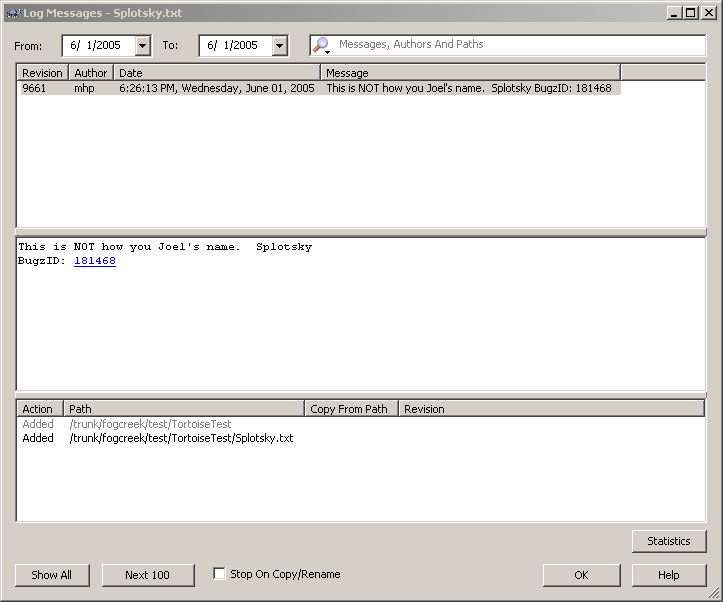
And the circle completes. From source control to FogBugz and back again.
If you aren't using Subversion, you should be (especially if you've ever read KB 133054) And if you are using Subversion, you should definitely download TortoiseSVN. With FogBugz, Subversion and TortoiseSVN, all the info you ever need will be at your fingertips.
If you integrated your source control system with a FogBugz trial and later decided to purchase FogBugz, it is easy to convert the source control integration to work with your new installation. You will need to make a few modifications to the trial trigger script that you downloaded and have been using with your trial up until this point.
-
Find the trigger script that you downloaded from your trial and moved into your source control directory. The name of this script begins with "logBugData" and ends with either ".vbs" or ".pl". For instance, if you use Subversion then you need to find your repository/hooks directory and locate logBugDataSVN.vbs or logBugdataSVN.pl.
- Edit the script and change the IS_TRIAL parameter to 1. For example, the VBScript version requires that you change the line:
Dim IS_TRIAL : IS_TRIAL = 0
to
Dim IS_TRIAL : IS_TRIAL = 1
-
If you recall, when you initially configured your source control integration, you were able to skip a step or two in the instructions because you were using our trial server. Now that you're using your own FogBugz server, you need to edit the trigger script and set the BUGZ_SERVER, BUGZ_PORT, BUGZ_URL, and CVSSUBMIT variables appropriately. For detailed instructions, refer back to the original instructions for setting up source control integration.
-
Once you have updated these five settings (IS_TRIAL and the four variables from step 3), your source control system is configured to integrate with your newly purchased FogBugz installation.